
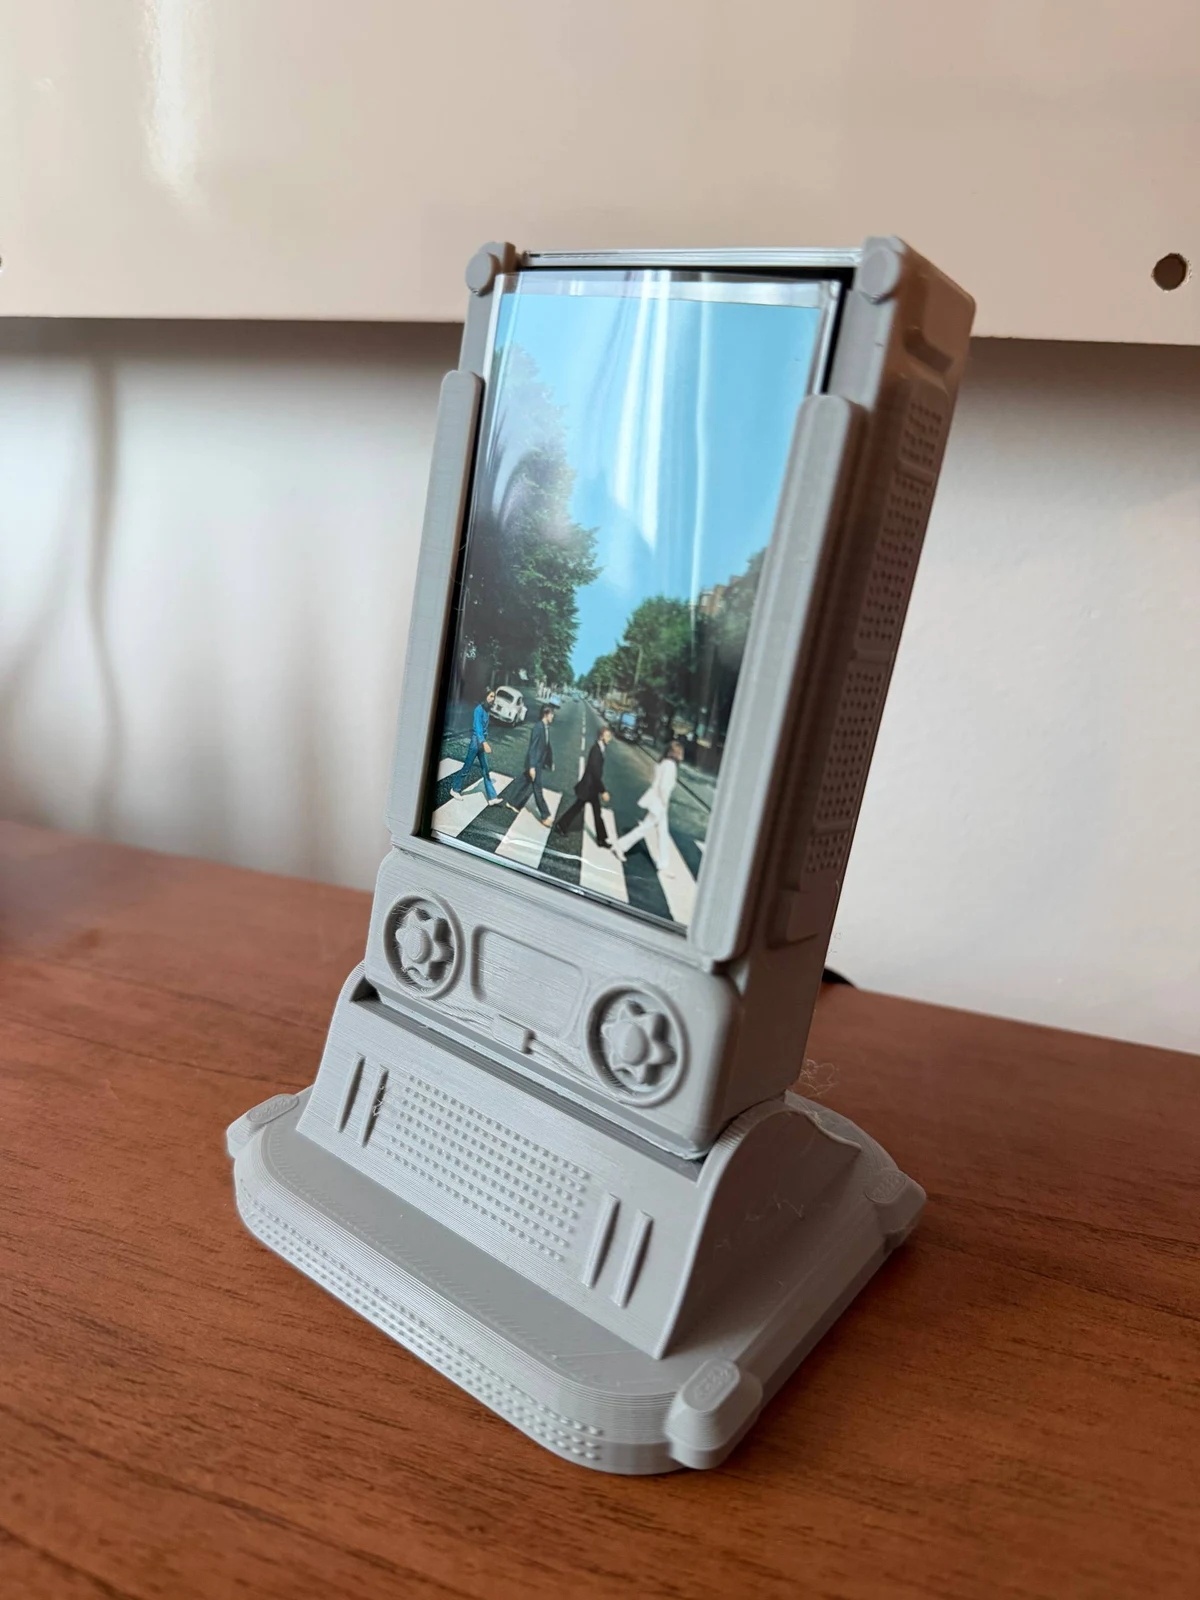
THE SHORT VERSION
Your first card, without the fuss.
You do not need to start with fifty printed covers or buy every component at once. If you already have a computer and a working Plex library, start with a USB reader and one card. The enclosure and dedicated computer can come later.
- Open Album Cards. Follow the installation steps below.
- Connect Plex. In Settings, choose Plex / Caldera and import an album you can already play.
- Check the audio. Choose your Caldera player and use the album’s play button before introducing the card.
- Select the album and open Cards. Click Assign selected, tap the card on the reader configured in Linux.
- Switch to Playback. Remove the card and tap it again. That card now selects that album.
Follow the full tutorial from the parts list. If your library is on Spotify, there is an alternative using Spotify Connect. You do not need to configure both services.
The code is freely available in the official Album Cards repository, with English documentation and additional Portuguese guides.
MY COSTS / SEPTEMBER 2026
The shopping list, with what I paid.
Here are the amounts I paid in September 2026, in Brazilian reais. They are a record of my build, not current quotes: your costs will depend on what you already own and where you buy or print.
| Item | What it covered | Cost / material used |
|---|---|---|
| Orange Pi 3B | Bought on AliExpress; also my everyday Caldera music player. | R$ 300 |
| USB RFID reader | One reader for the collection. | R$ 70 |
| 50 MIFARE cards | The pack used for my album cards. | R$ 90 |
| Printing | 50 cover artworks + 50 track-list cards (100 printed sides). | R$ 55 |
| 100 Chimera sleeves | 57.5 × 89 mm; 50 for this collection, with 50 left over. | R$ 20 |
| 3D-printed enclosure | 100 g of filament. Material cost is not included in the subtotal. | 100 g |
| Confirmed subtotal · five purchases | R$ 535 | |
And the rest of the setup?
The subtotal above is not the price of an entire sound system. Here are the other items used or needed for this setup; their costs have not been included yet.
| Item | How I use it | Cost |
|---|---|---|
| Edifier M90 | My USB speaker. You can reuse a compatible speaker or USB DAC and powered speakers. | Not included |
| Power supply, storage and cables | Power for the Pi, system storage and the required USB connections. Check what comes with your board. | Not included |
| Music server · Plex setup | A computer with your collection, available on the network. Not needed for Spotify. | Not included |
Album Cards and the 3D model downloads are free. Subscriptions, electricity, shipping and taxes not itemized here are not added to the subtotal. For Spotify, budget for your Premium plan separately; it is a recurring cost, not a one-time purchase.
The Orange Pi does more than read cards.
Its main job in my setup is to be a network music player with Caldera. I choose music from my Plex collection in Plexamp on my phone; the Orange Pi 3B plays it through the Edifier M90 over USB. I get wireless control from the couch without sending the audio over Bluetooth, so this path avoids Bluetooth audio compression. The phone is the remote; the small computer beside the speaker handles playback.
The RFID cards add another way to choose an album on that same player. The R$ 300 was therefore not an investment just for this project. Audio quality still depends on the source files and playback settings.
Leaving out the Orange Pi, my reader, 50 cards, printing and the pack of 100 sleeves came to R$ 235. The cards and printing alone cost R$ 145, or R$ 2.90 per album card, before sleeves and other finishing materials.
The R$ 535 subtotal covers the five purchases priced above. The 3D enclosure used 100 g of filament: to estimate its material cost, divide your 1 kg spool price by 10. Printing services, electricity and failed prints may cost extra. The speaker, music server, cables, power supply, storage and subscriptions are not included. The Spotify version can reuse a Linux computer and needs no music server, but requires a Spotify Premium subscription.
FULL SETUP / LOCAL COLLECTION
Your albums, with Plex and Plexamp.
BEFORE YOU START
How does it work?
Think of each card as a physical shortcut to an album. The picture helps you choose; the small chip lets the system recognize your choice. The songs are not stored on the card.
There are two jobs behind the scenes: choosing the album and delivering its sound to the speakers. Here is what happens in my setup:
- The reader recognizes a card. Each card has an identifying number, its ID. My USB reader sends that number to the computer as if it were a keyboard typing it.
- Album Cards looks up your choice. During assignment, you save a link such as “this card = Abbey Road”. In playback mode, a scan looks up that link. The assignment is stored in the app, so you do not need to write the album into the chip.
- Plex keeps the music organized. Plex Media Server runs on my home server, the computer holding my music files. It provides the album information and makes the tracks available to the player over the local network.
- Caldera plays the album. Album Cards sends the playback command to Caldera on the Orange Pi beside the speakers. Caldera receives the music from Plex and outputs the audio over USB to my Edifier M90. A compatible Raspberry Pi or Linux computer can take the Orange Pi’s role.
- The phone is another remote. Plexamp on my phone can control that player too. I can choose music from the couch without carrying the audio over Bluetooth. The server and player stay running; a card is another way to make the selection.
First, import the album information and assign the cards. After that, keep the app in playback mode. The printed cover, track-list card and 3D enclosure make the collection enjoyable to use, but the identification works even with a blank card.
This is how my project works: my own music files, served by Plex, with a Linux computer dedicated to playback. You choose the source files and audio equipment. The final sound quality also depends on the file format, playback settings and audio output.
The idea came from wanting to choose music by looking at a cover, rather than scrolling through a list on my phone. Each card became a small album edition: artwork on the front, tracks and details on the back.
In my original setup, the music lives on a Linux home server running Plex Media Server. An Orange Pi next to the speaker runs Caldera and receives the USB reader. I use the Edifier M90, connected to the Orange Pi by USB and set to USB audio mode. That is my speaker model; another powered speaker with USB audio input or a compatible DAC can fill the same role. Plexamp on my phone can also control that player.
With a Raspberry Pi, it takes the place of that small computer beside the speaker. This guide uses 64-bit Linux. The Raspberry instructions adapt the same approach; the physical setup I tested used an Orange Pi.
A computer or server holding your music files.
Album Cards, USB reader, Caldera and audio output.
Import albums, assign cards and prepare the print files.
These roles can share a computer. Keeping them separate lets your server stay where it already is, with a small music station in the living room. Keep the devices on the same local network; guest-network isolation can prevent discovery.
Who does what in this setup
Plex organizes and serves your files. Plexamp is the music app that accesses that library. Caldera is a third-party Linux player that can run without a display and be controlled by Plexamp. Album Cards is this project’s app: it maps a card ID to an album and sends the playback command.
Caldera is separate from Plexamp. See the Caldera Linux documentation for supported platforms and installation.
02 / GATHER THE PARTS
What goes on the workbench?
| Part | What to look for |
|---|---|
| USB RFID reader | The 13.56 MHz reader used in my project, which types the card number like a keyboard and finishes with Enter. See the reader on Mercado Livre ↗ |
| 13.56 MHz cards | I used MIFARE S50 / 1K cards. See the 50-card pack on Mercado Livre ↗ |
| Raspberry Pi or Linux computer | For this Raspberry path, use a model that supports 64-bit Raspberry Pi OS, such as Pi 4 or Pi 5, with the correct power supply. |
| Storage and networking | A microSD card for the system, a card reader to prepare it, and Wi-Fi or Ethernet. The music can stay on another computer. |
| Audio output | A speaker with USB audio input, or a USB DAC connected to powered speakers. A USB charging port alone cannot receive audio. My setup uses an Edifier M90 over USB. |
| Data cables | A USB cable that carries data for the reader. Use the computer manufacturer’s recommended power supply. |
| Optional finishing materials | A 3D-printed enclosure, printer-compatible photo paper, Chimera sleeves (57.5 × 89 mm), a ruler and cutting tools. |
These links point to the project’s reference listings in Brazil. Check the selected variation and compatibility with the seller. “NFC” or “reader/writer” in a listing does not guarantee keyboard output. The useful test is whether the computer receives the card ID.
We may earn a commission from these links at no additional cost to you. The cost section records what I paid in September 2026; current listing prices may differ.
BEYOND THE CARDS
A network music player, even without the cards.
The Raspberry Pi or Orange Pi can stay beside your speakers as your everyday music player. Choose an album in Plexamp on your phone, select Caldera as the playback device and press Play. On the same local network, your phone sends the commands while the Pi receives the music from Plex and sends audio to the speaker over USB. You can keep browsing on the phone while the dedicated player handles playback.
Two ways to request the same album.
The music travels from your server to the Pi over your network.
Audio reaches the speaker through a cable, with no Bluetooth stage.
The cards are the fun part of choosing what to play. They do not improve or change the audio. Select the same recording, player and settings on the phone and you get the same audio path. The USB reader, printed covers and 3D enclosure are optional extras around a network player that is already useful by itself. Caldera supports remote control from Plexamp.
Wireless control, without Bluetooth audio compression.
With this network-to-USB path, your phone does not need to send audio to the speaker over Bluetooth. Common Bluetooth codecs such as SBC and AAC use lossy compression; avoiding that stage removes one possible lossy conversion. With a genuine FLAC source in Plex, playback without lossy transcoding and a compatible output, you can preserve lossless audio along this path. Wi-Fi itself does not require turning the music into a lower-quality audio format.
Lossless means preserving the audio data, not necessarily using an uncompressed file: FLAC compresses audio without discarding its samples. Converting an MP3 to FLAC does not restore information that was already removed. Output settings, resampling, equalization and volume processing also matter; a USB cable alone is not proof of bit-perfect playback.
There is no honest universal percentage. File size, bitrate and the percentage of data saved by compression do not measure perceived sound quality. A difference may be noticeable, subtle or inaudible depending on the codec, recording, speakers, room and listener. The concrete benefit is avoiding an extra lossy stage and having a dedicated player—not a promise of “30% better sound”. Compare the same master at matched listening volume, preferably without knowing which version is playing.
What about Spotify and Apple Music Lossless?
With Spotify, choose the Pi’s receiver in Spotify Connect on your phone and press Play: you can also use it without cards. The receiver gets the music directly from Spotify and outputs it over USB. The Raspotify configuration in this project uses lossy audio at up to 320 kbps. It avoids Bluetooth transmission, but this setup is not a promise of Spotify Lossless support.
If both players use exclusive USB handoff, only the selected receiver is available. A card switches it automatically. To switch manually, run bash deployment/dev.sh audio spotify or bash deployment/dev.sh audio plex on the Pi before selecting it on your phone.
Apple Music Lossless is another example of a lossless source. It needs a compatible playback device and audio connection, such as a supported device connected by cable to a DAC or powered speaker. This guide does not integrate Apple Music with Caldera or Raspotify. Owning the Pi does not automatically make it an Apple Music Lossless receiver; that would require a separately supported and verified playback solution.
PREPARE YOUR PLAYER
Which operating system should I use?
For a dedicated player, I recommend a 64-bit Linux system without a desktop. You configure it from another computer and then leave it beside the speakers, with no monitor or browser needed for daily listening.
- Raspberry Pi 4 / 5: Raspberry Pi OS Lite 64-bit. Use Raspberry Pi Imager and select your exact board.
- Orange Pi 3B: Armbian Minimal / CLI with stable Debian userspace, using the image specifically made for the 3B. This is a community-supported board; check image and hardware-revision notes. My existing build uses Armbian with Debian 12. New images may use Debian 13; I have not physically tested every image or board revision.
- PC Linux: A current 64-bit Debian or Ubuntu installation works as the host. Keep a desktop if you want to use the native Spotify application on that PC.
- Download the imager from the official Raspberry Pi or Armbian site. Choose the board and its 64-bit image.
- Set your username, password, hostname, network and SSH access. Flash the correct microSD: this erases that card.
- Boot the board with a suitable power supply. Use Ethernet for the first setup if possible. Connect the USB audio device and select its USB input.
- From your computer, open a terminal and connect using the username and address you chose. Replace the example below with your own values.
ssh your-user@your-player.localI bought my Orange Pi 3B on AliExpress. Start at the manufacturer’s 3B page to check specifications and store links. Buy the correct power supply and storage too; a board alone is not the full player.
Official step-by-step guides: Raspberry Pi · Armbian.
04 / MAKE THE MUSIC PLAY FIRST
Get one album ready in Plex.
- Install Plex Media Server on the computer holding your music and sign in.
- Add a Music library in Plex, select your music folder and wait for it to organize the files.
- Choose a familiar album. Check the artist, edition, cover and track order. Test several tracks, including the last one. MusicBrainz Picard can help correct file tags, but is not required for the player.
- Install Caldera on the computer connected to your speaker, following the official installation page. Sign into the same Plex account and enable the service as instructed.
- In Plexamp, select Caldera as the playback device. Select the correct audio output on the computer and confirm that the speaker plays.
Before RFID enters the picture, Plexamp should be able to play the album through Caldera. If there is no sound, check the speaker input, volume and audio output. The card will trigger a command that should already work.
The music library must stay accessible. If your music is on an external drive, it must be connected and mounted when Plex starts. Seeing covers and track names does not prove that the server can still open the files.
ALBUM CARDS
One app, on the computer connected to the reader.
Album Cards handles albums, assignments, artwork and PDFs. Install it on the Linux computer where the USB reader will stay. Its background service will read the cards even when you close the configuration browser.
- Install Node.js 24 LTS for your architecture (ARM64 on the Pi; x64 on a typical PC), and Git. Check
node --versionandnpm --version. - Download the public repository and install its dependencies. Both tutorial languages use this same application.
git clone https://github.com/luizguilherme5/album-cards-en.git
cd album-cards-en
npm ci
npm run build
bash deployment/dev.sh setup
bash deployment/dev.sh up
This starts the built application as a service. On the Linux computer itself, open http://127.0.0.1:3850. If it has no screen, open a second terminal on your own computer and run:
ssh -N -L 3850:127.0.0.1:3850 your-user@your-player.localKeep that terminal open while configuring, then visit http://127.0.0.1:3850 on your computer. The tunnel securely takes you to the app on the Pi. The reader stays connected to the Pi. Closing the tunnel later does not stop music or the reader service.
For development or a quick local test, npm run dev starts the same application without compiling first. Do not run it alongside the service on the same port. For everyday use, use the service commands above.
Connect the reader once.
- Plug the reader into Linux. In Settings, choose Detect Linux devices. Select your reader by name and save settings.
- Wait for USB reader connected. If access is denied, follow
docs/READER.mdto grant access only to that USB reader. The app should run under your normal account. - The app remembers the reader’s identity and retries when it is reconnected. If two identical readers appear, select the intended one again. In native Linux mode, no text field needs focus.
06 / BRING YOUR COLLECTION
Let’s use Abbey Road as an example.
The screenshots in this guide use my real Plex collection in the new Album Cards app. I started with six albums to demonstrate the process. You can choose any album already in your Plex library.
- Open Settings and choose Plex / Caldera as your playback service.
- Enter the Plex address and port, for example
http://your-server:32400, and your token. The official Plex guide explains how to find a token in an item’s XML. This method may provide a temporary token; update your configuration if it expires. Treat it like a password and keep it out of screenshots. - Click Find Caldera on the network, choose your player and click Save settings. If discovery finds nothing, check your Plex account and network. You can also enter the Caldera address and identifier manually.
- Click Choose Plex albums, search for “Abbey Road”, select the edition you want and click Import selected. A batch can contain up to 50 albums.
- Return to Collection. The original cover and tracks are there. Use Details to review the data and ▶ to test the playback command.
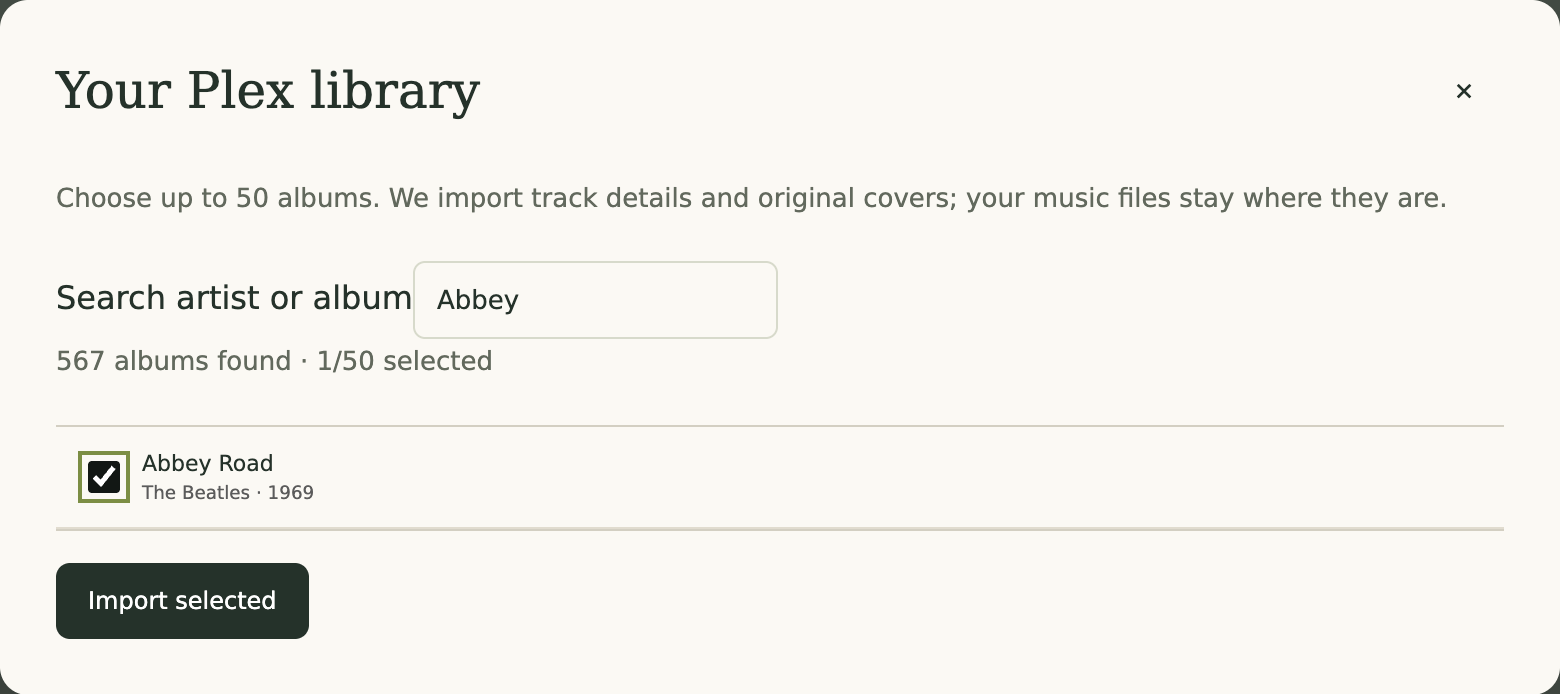
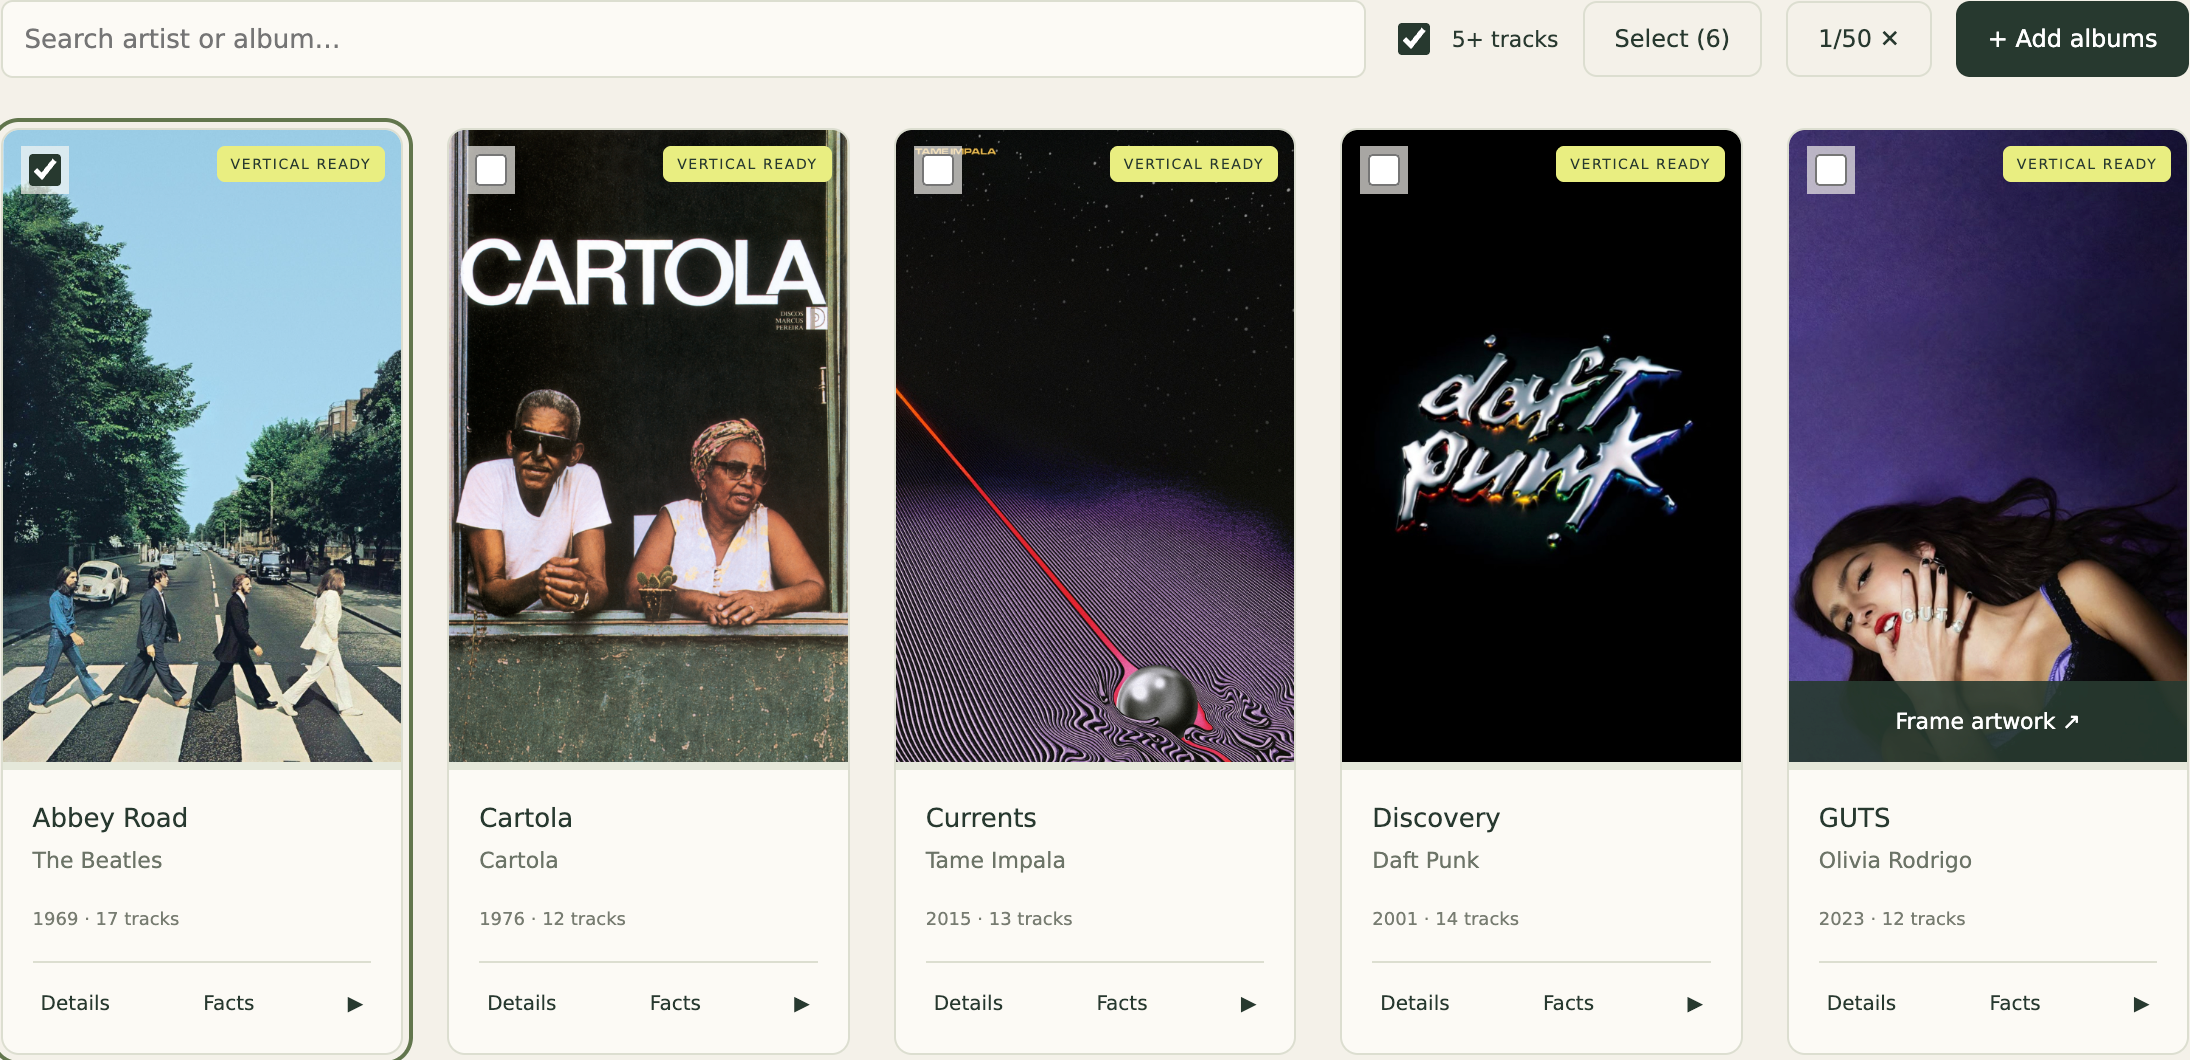
Importing reads the metadata and copies artwork into the app. It does not move or rename your music. Existing original covers and saved vertical artwork are preserved when you reimport.
I would rather start with a folder of music files.
In Collection, click + Add albums, browse to the folder and choose Import this folder. That folder must be accessible on the computer running Album Cards. The app reads tags, groups albums and looks for embedded or separate cover images.
This prepares the collection and track-list cards; Album Cards is not a local audio-file player. For card-triggered playback, the album still needs a Plex or Spotify link in its metadata. Importing from Plex creates the Plex link automatically.
07 / GIVE THE CARD AN ALBUM
One tap to assign it.
You do not need to write music or data into the card’s memory. It already has an identifier. The app stores the relationship between that number and Abbey Road.
- Select the Abbey Road checkbox in Collection and open Cards.
- Click Assign selected and check the album beside “Next”.
- With the Linux reader configured in Settings, tap a card. No text field needs focus; the Pi reads the USB device directly.
- Check the assignment confirmation. If you selected several albums, the queue proceeds alphabetically. Use a different card for each next album.
- When finished, click Playback. Remove the card and tap it again to start the album.
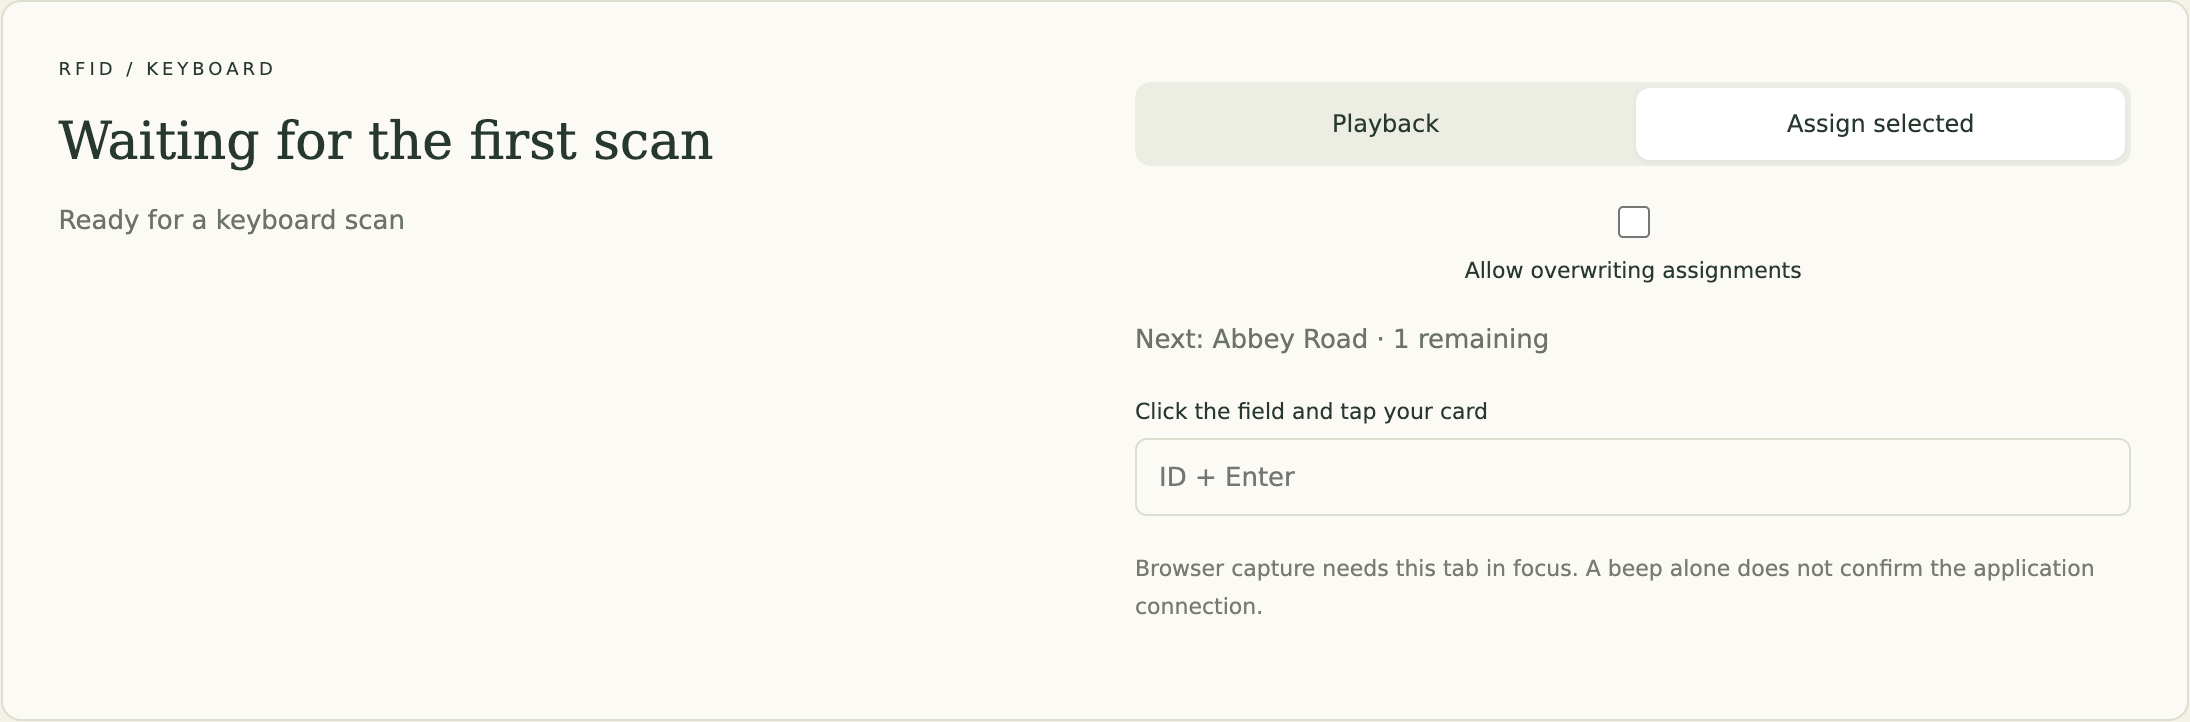
Reusing a card? Enable “Allow overwriting assignments” before starting. Assignment mode does not play music. One ID cannot fill two positions in the same batch, and assignment sessions expire after five minutes.
What happens after assignment?
- A different card starts its album at the first track.
- Tapping the same card again requests a random track from that album.
- Removing the card does not pause playback. This reader does not report removal to the app, even though its LED changes color.
I want the Pi to read cards without a focused browser.
On 64-bit Linux, go to Settings → Detect Linux devices. Select the reader, preferably using its stable /dev/input/by-id/…-event-kbd path, and save. The app reads that device directly while running, even with the browser closed.
This adapter supports readers that type numeric IDs using the keyboard’s top number row or numeric keypad. For permission errors, follow docs/READER.md to grant the app’s user access to that specific device. You do not need access to every keyboard or to run the whole app as administrator. The dedicated setup uses native Linux input, not browser keyboard capture.
Turn it on, tap a card, listen.
After installing and connecting Caldera, run this command from the Album Cards directory on Linux:
bash deployment/dev.sh enable plexIt enables Album Cards and the selected player at boot, including when nobody logs in. It may request your Linux password once. The computer must stay powered on and awake. Return the app to Playback mode before finishing; assignment mode is only for registration.
bash deployment/dev.sh status
bash deployment/dev.sh logs
bash deployment/dev.sh restart
These show service status, recent messages and restart the app. Try a restart and a card scan before putting the player away. Back up the data/ folder to preserve assignments, images and private connection settings.
Can I mix Spotify and Plex cards?
Yes. Choose the player in each album’s Details. Imports already select their source service. When both players share one exclusive USB output, enable audio handoff as described in docs/LINUX.en.md, then run bash deployment/dev.sh enable both. Album Cards stops the other player when switching, releasing the audio device. The first card after a switch may take a few seconds.
ARTWORK AND TRACK LISTS
Fit the artwork to the card.
Click an album image to open the editor. Choose Upload artwork, drag to position it and adjust the zoom. The frame already has the final proportions: 54 mm wide × 85.6 mm tall.
For Abbey Road, I used a vertical image with extra sky and positioned it to keep all four band members near the bottom. A square cover can lose content when cropped to fill the card. Preparing a vertical version first gives you more control. The editor crops and positions artwork; it does not invent or extend backgrounds with AI.
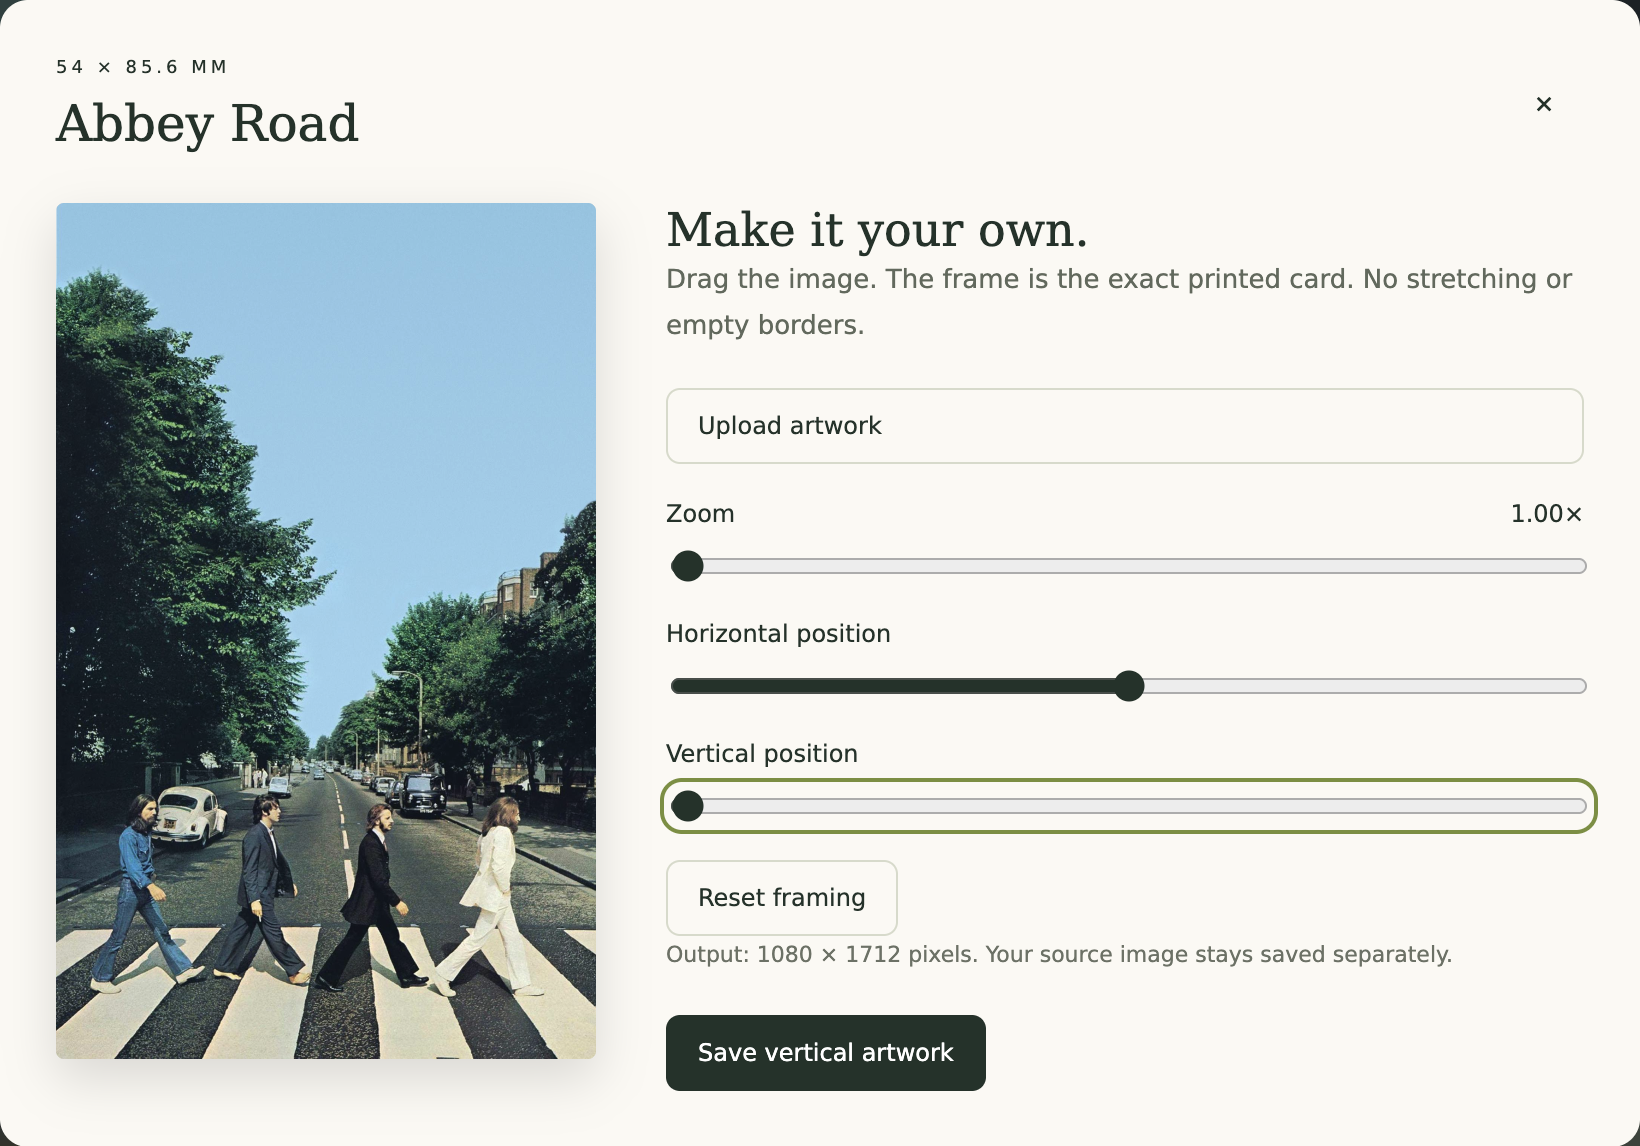
Click Save vertical artwork. The collection updates its preview and marks it ready. The original Plex cover and uploaded crop source stay separate. Editing a card does not change the cover in your Plex library.
Make room for your creativity.
Album covers are usually square; our cards are vertical. There are plenty of ways to bring the two together. For some cards in my collection, I used AI image editing to extend the background before uploading the result to Album Cards. That was a creative choice for my project, not a requirement for yours.
How I prepared the AI-assisted versions
- I started with the original cover in good resolution and attached it as the reference in an image editor with generative expansion.
- I asked for a vertical composition in the card’s proportions, extending the background rather than stretching the picture. The aim was to retain the cover’s identity, subjects and lettering. The position depends on the artwork: not everything needs to sit in the center.
- I compared the result with the original. AI can change faces, lettering and details or create visible seams and repeated objects. I discarded or revised versions that did not work; the first result was not always the one I kept.
- I uploaded the chosen image to Album Cards, adjusted its position and zoom, and saved the final crop. The app handles the print proportions; the AI editing happens separately.


Prefer to design it yourself? Absolutely.
You can keep the original cover exactly as it is and build a lovely card around it in Canva, Photoshop or your favorite editor. A square cover with a colorful border, a little breathing room or a title beneath it can become a template for the whole collection. You do not need to fill every corner with the photograph.
- Create a portrait canvas of 1080 × 1712 px, the same proportions as a 54 × 85.6 mm card.
- Place the complete original cover without stretching it. Choose its size and position, then use the remaining space for a background color, borders or your own graphic elements. Keep small text away from the cutting edge.
- Export as PNG or high-quality JPG. Click the album’s artwork in Album Cards, choose Upload artwork, check the full template in the preview and click Save vertical artwork.
Use the tools you feel comfortable with. Try colors, layouts and materials, and make a test print before committing to a batch. The fun is making a collection that feels like yours — creativity matters more than following my layout.
Prepare the back, too.
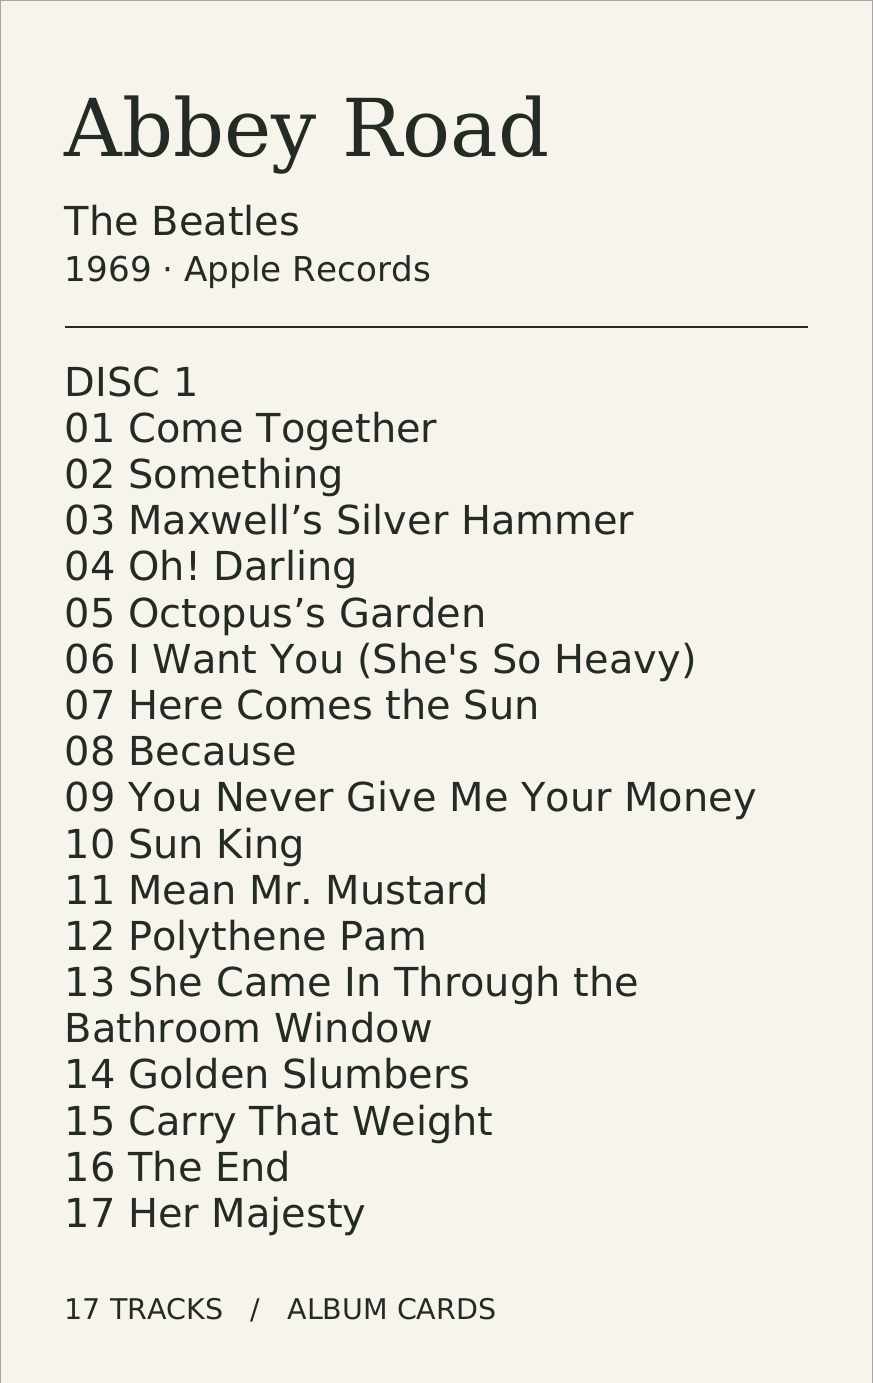
In Details, check the title, artist, year, record label and tracks. Each track has a number and disc number; use disc 1 and disc 2 for multi-disc editions. The import depends on metadata from the source service, so you may need to enter a missing label yourself.
Click Facts to preview the back before printing. The card uses those details, separates discs and fits the text into the available space. If it cannot fit within the legibility limit, generation reports an error instead of cutting off the last lines. Exported JSON stores album metadata for backup or transfer between installations.
PRINTING AND ASSEMBLY
Print a test sheet first.
- Select your albums, up to 50 per batch, and open Print studio.
- Choose Generate cover PDF for the fronts. Each selected album must have saved vertical artwork.
- Choose Generate fact sheet PDF for the backs. Both PDFs use the selection in alphabetical order.
- Review the preview and download the PDF. Select A4 paper, landscape orientation and 100% / actual size. Turn off “fit to page”.
- Measure a printed card: it should be 54 × 85.6 mm. Cut and assemble one before printing the whole collection.
Each sheet fits 10 cards, with 3 mm between artworks. For duplex printing, “Mirror back order” is available. The correct flip edge depends on your printer; test with one clearly marked sheet first. You can also print the fronts and backs separately, which is what I did.
The finished PDF, before using paper.
These are actual pages generated by the new app with the six example albums. The empty space is expected: the sheet holds ten cards, but this batch contains six.
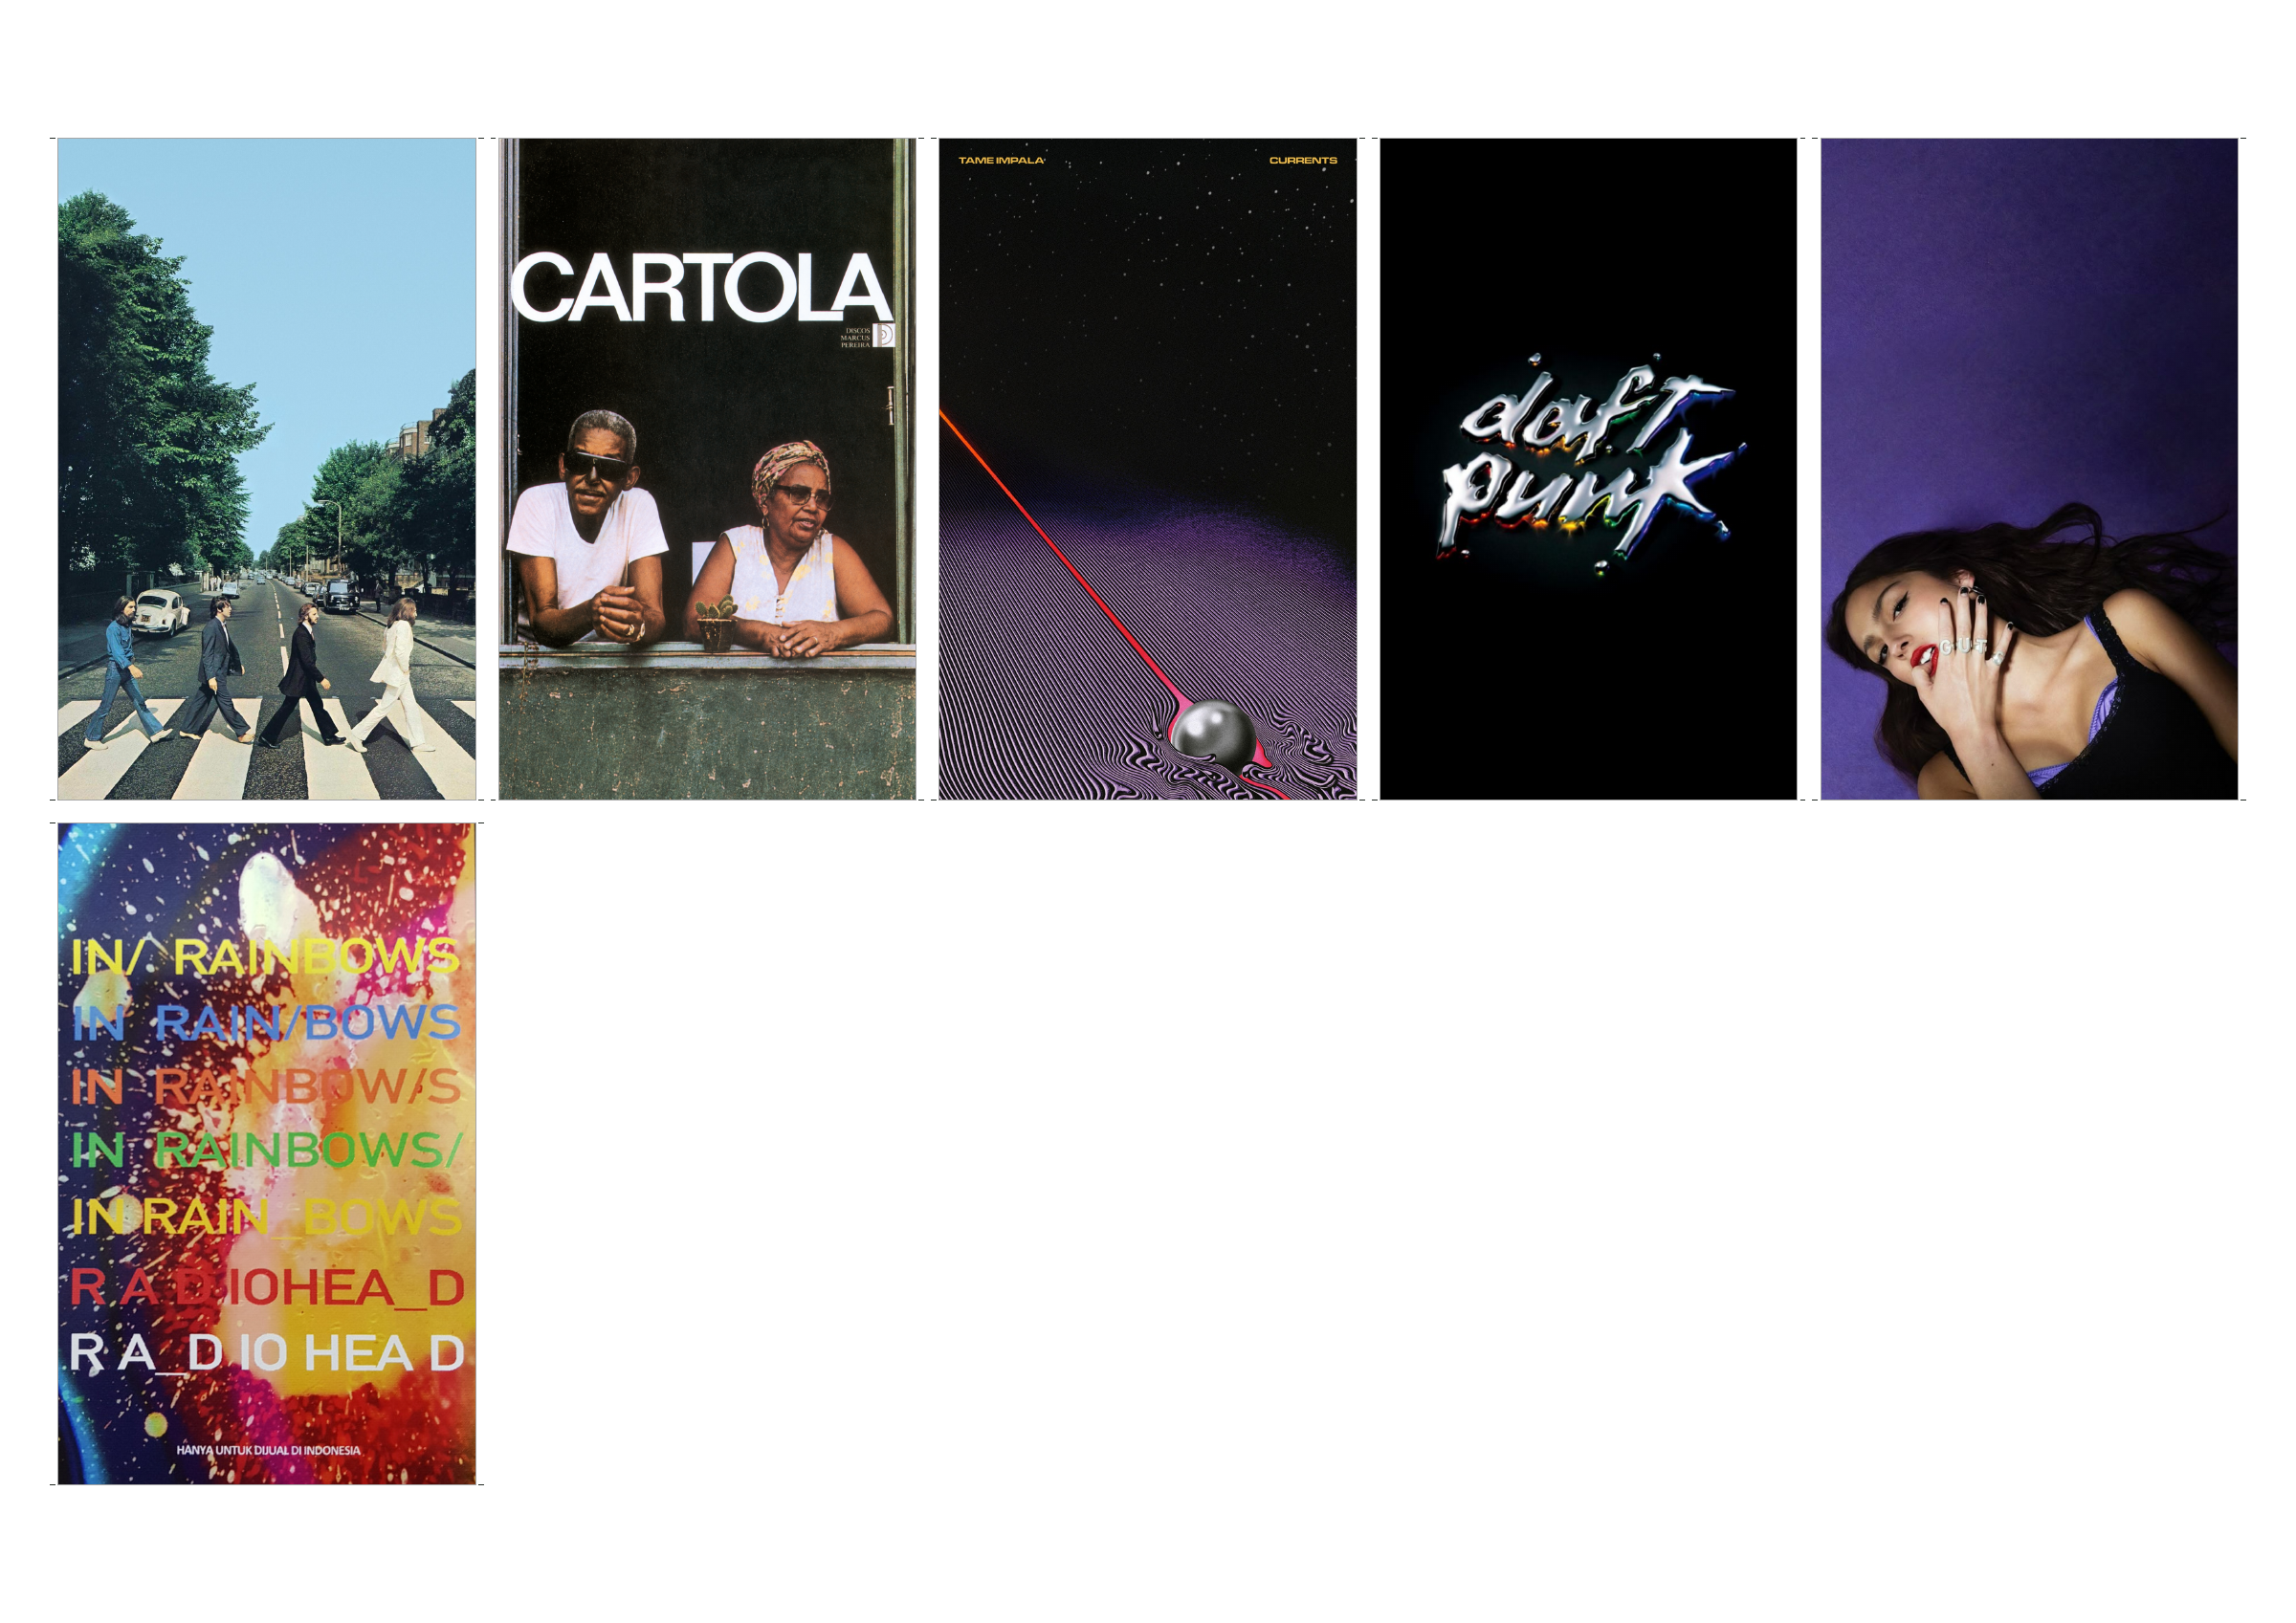
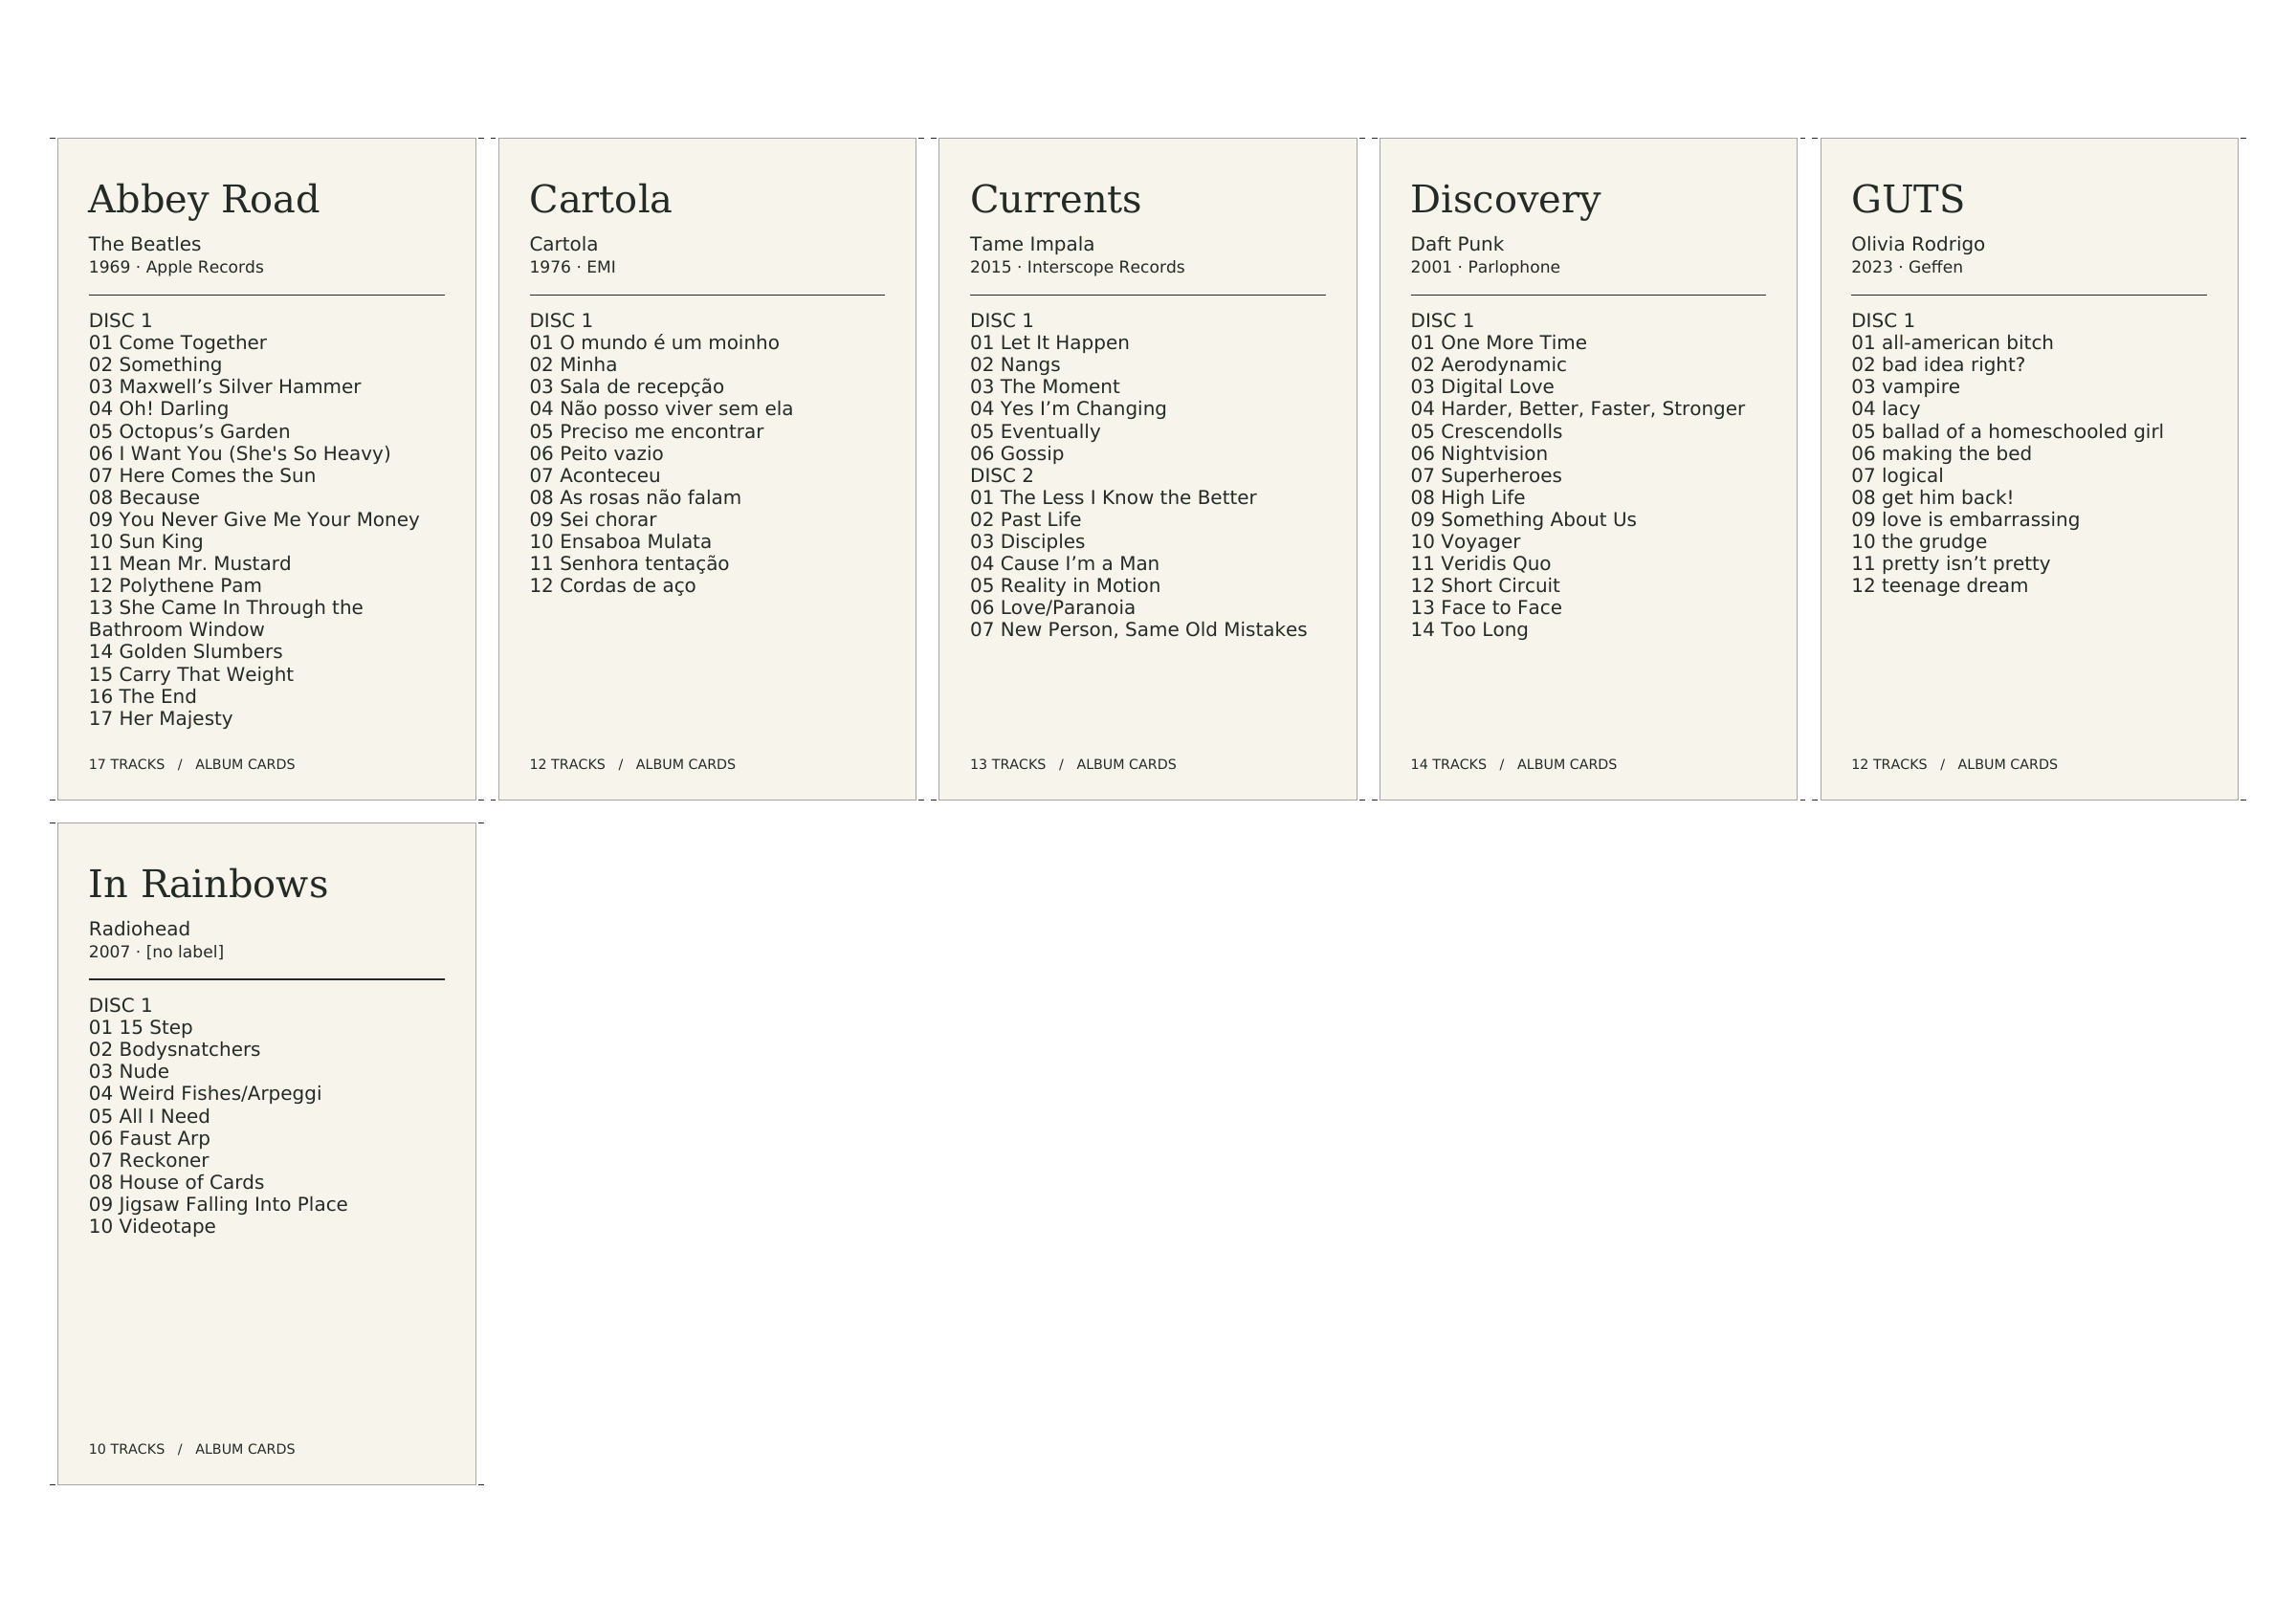
Open sample PDF — covers · Open sample PDF — track lists
How I printed and assembled mine.
I printed the fronts on thicker, glossy photo paper to give the cover more presence. For the backs, I used thinner, matte photo paper, which makes the track list comfortable to read. These are separate printouts on different papers.
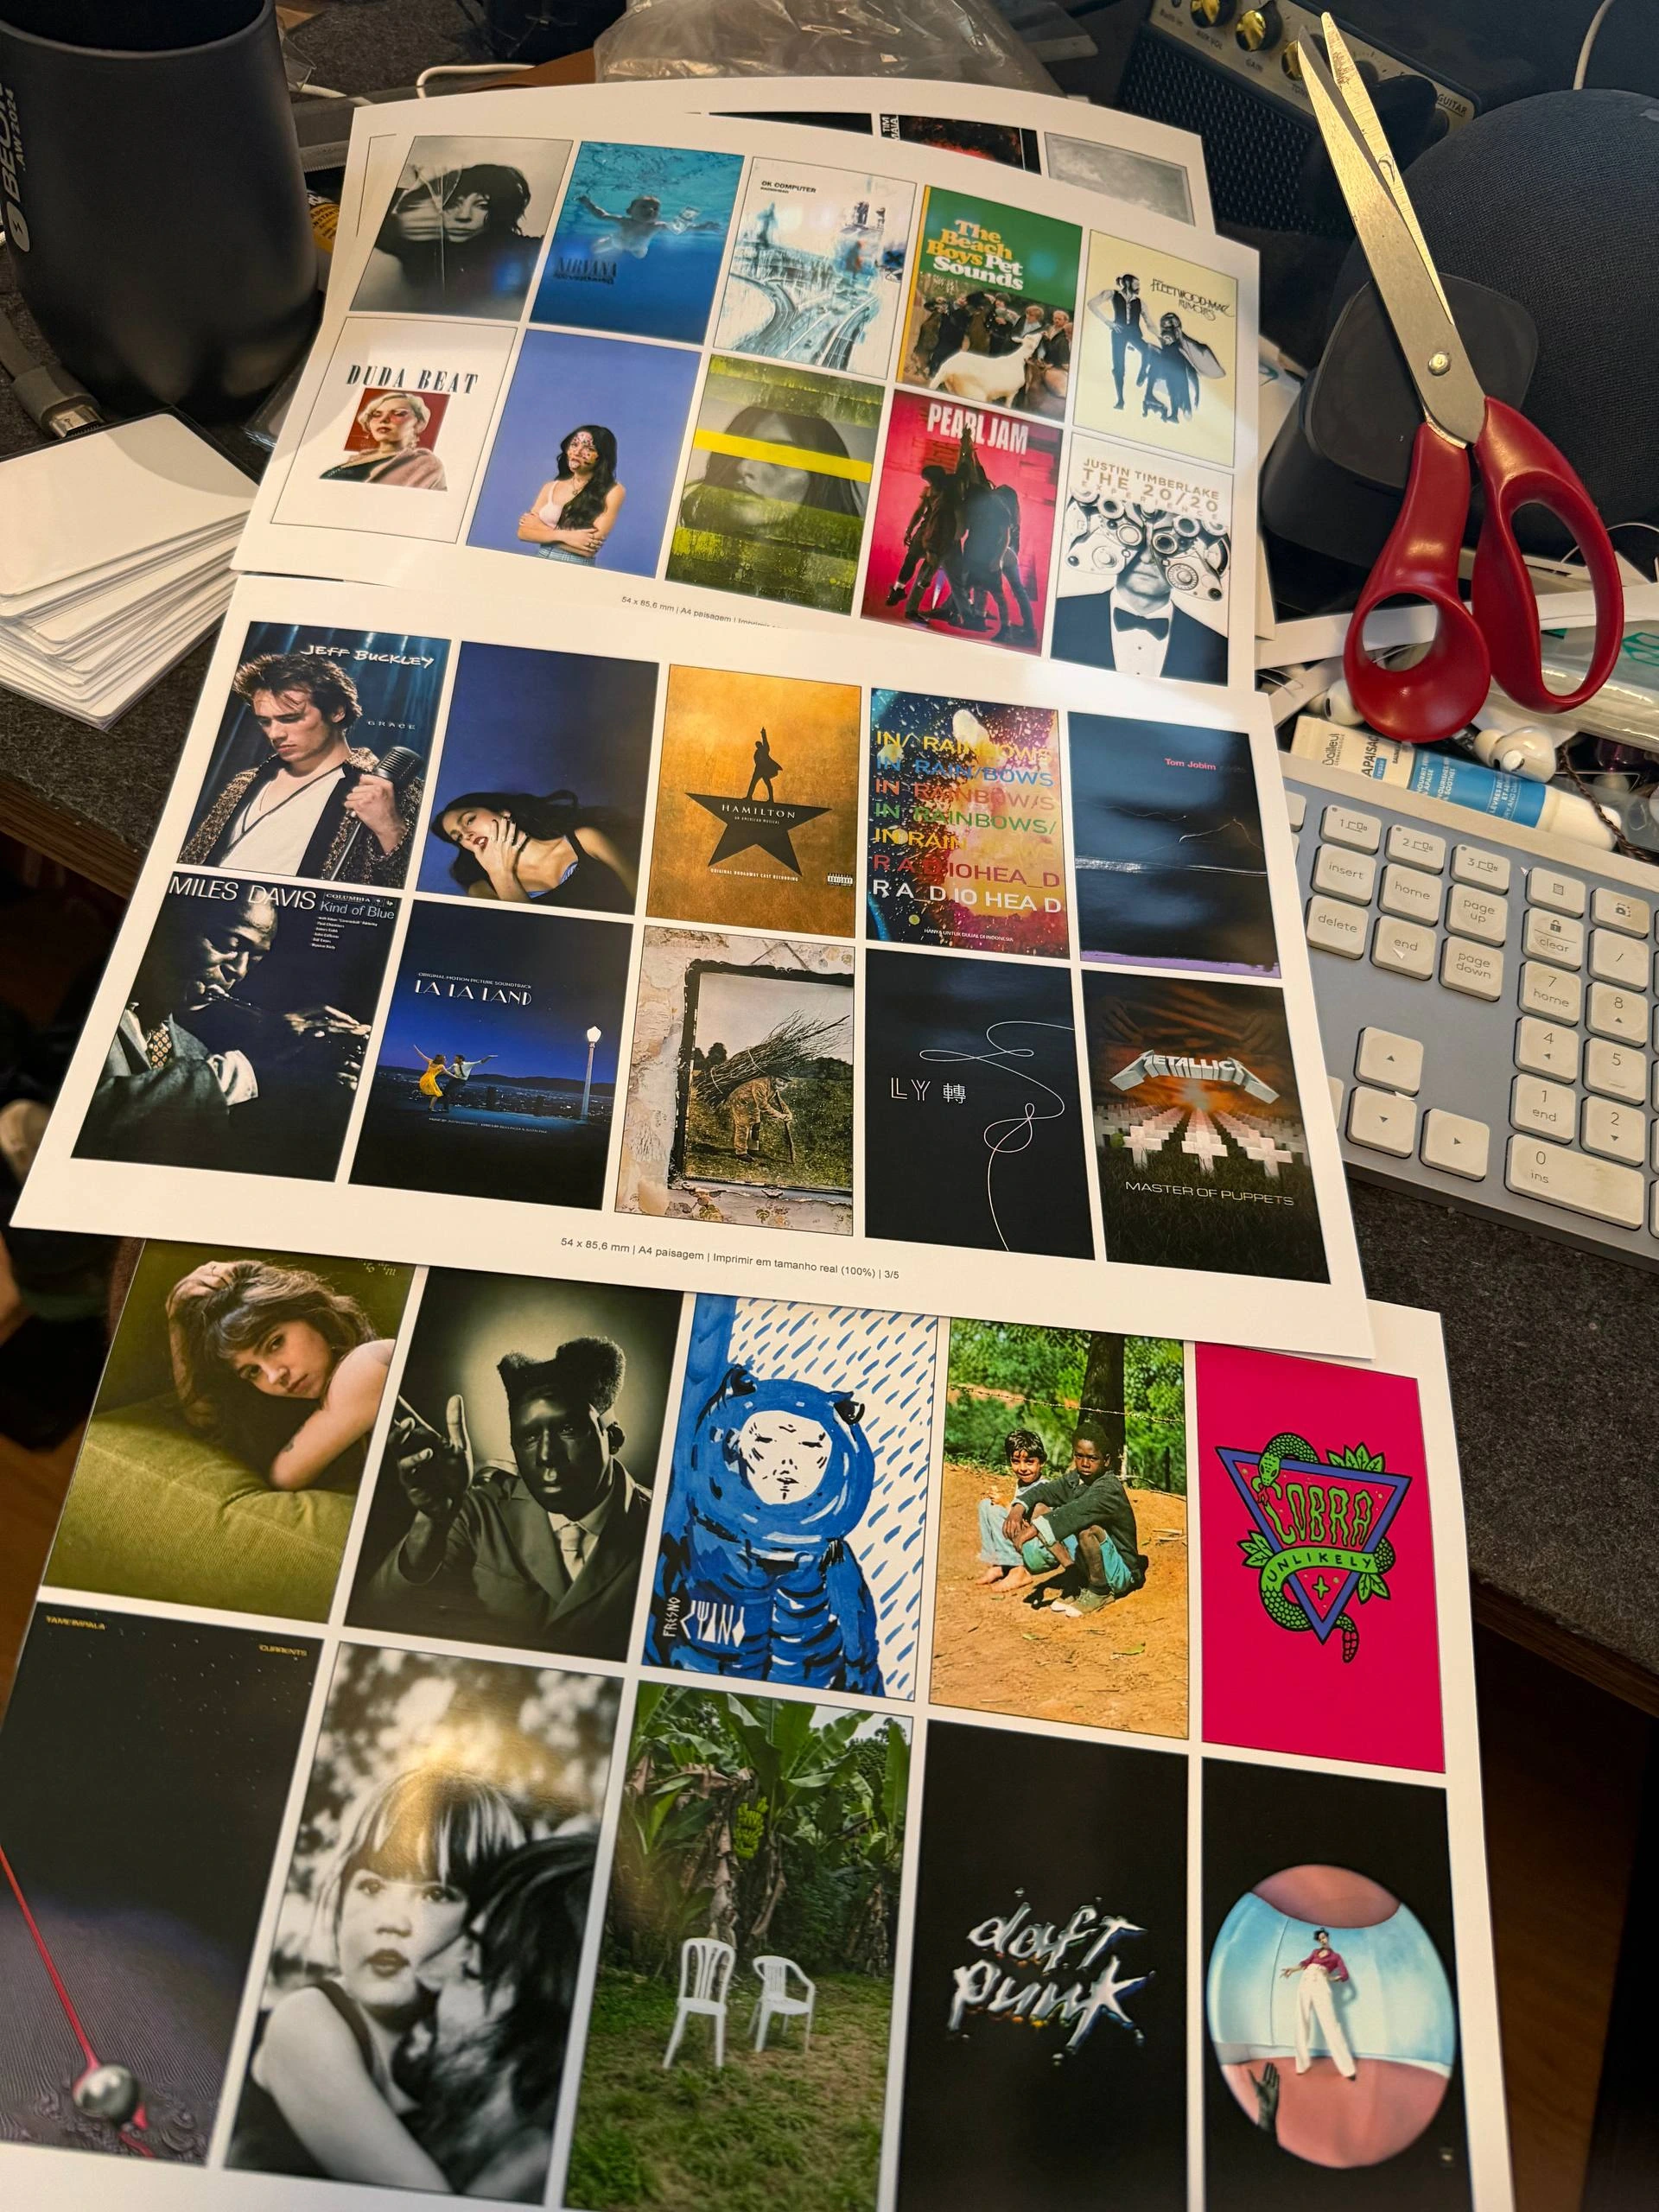
- Start with plain paper. Print at 100%, measure 54 × 85.6 mm and confirm that each front matches its back.
- Select the paper type in the printer dialog. Use the recommended setting for your glossy or matte paper and check the thickness your printer supports. There is no single required paper weight.
- Let the prints dry. Follow the paper manufacturer’s guidance before stacking, cutting or sleeving them.
- Cut along the marks. The 3 mm gaps give you room to separate the cards without cutting into the artwork. A ruler and cutting mat help keep the edges straight.
- Assemble one complete card. Put the RFID card between its cover and matching track list, with the printed faces outward. Test reading and fit before repeating for the whole batch.
The sleeve holds everything together.
I used Chimera sleeves measuring 57.5 × 89 mm to hold and protect the card and both printouts. Here is the 100-pack I used ↗. Check the dimensions of the selected product variation and test with your chosen paper: the combined thickness matters too. Do not force or bend the card to insert it.
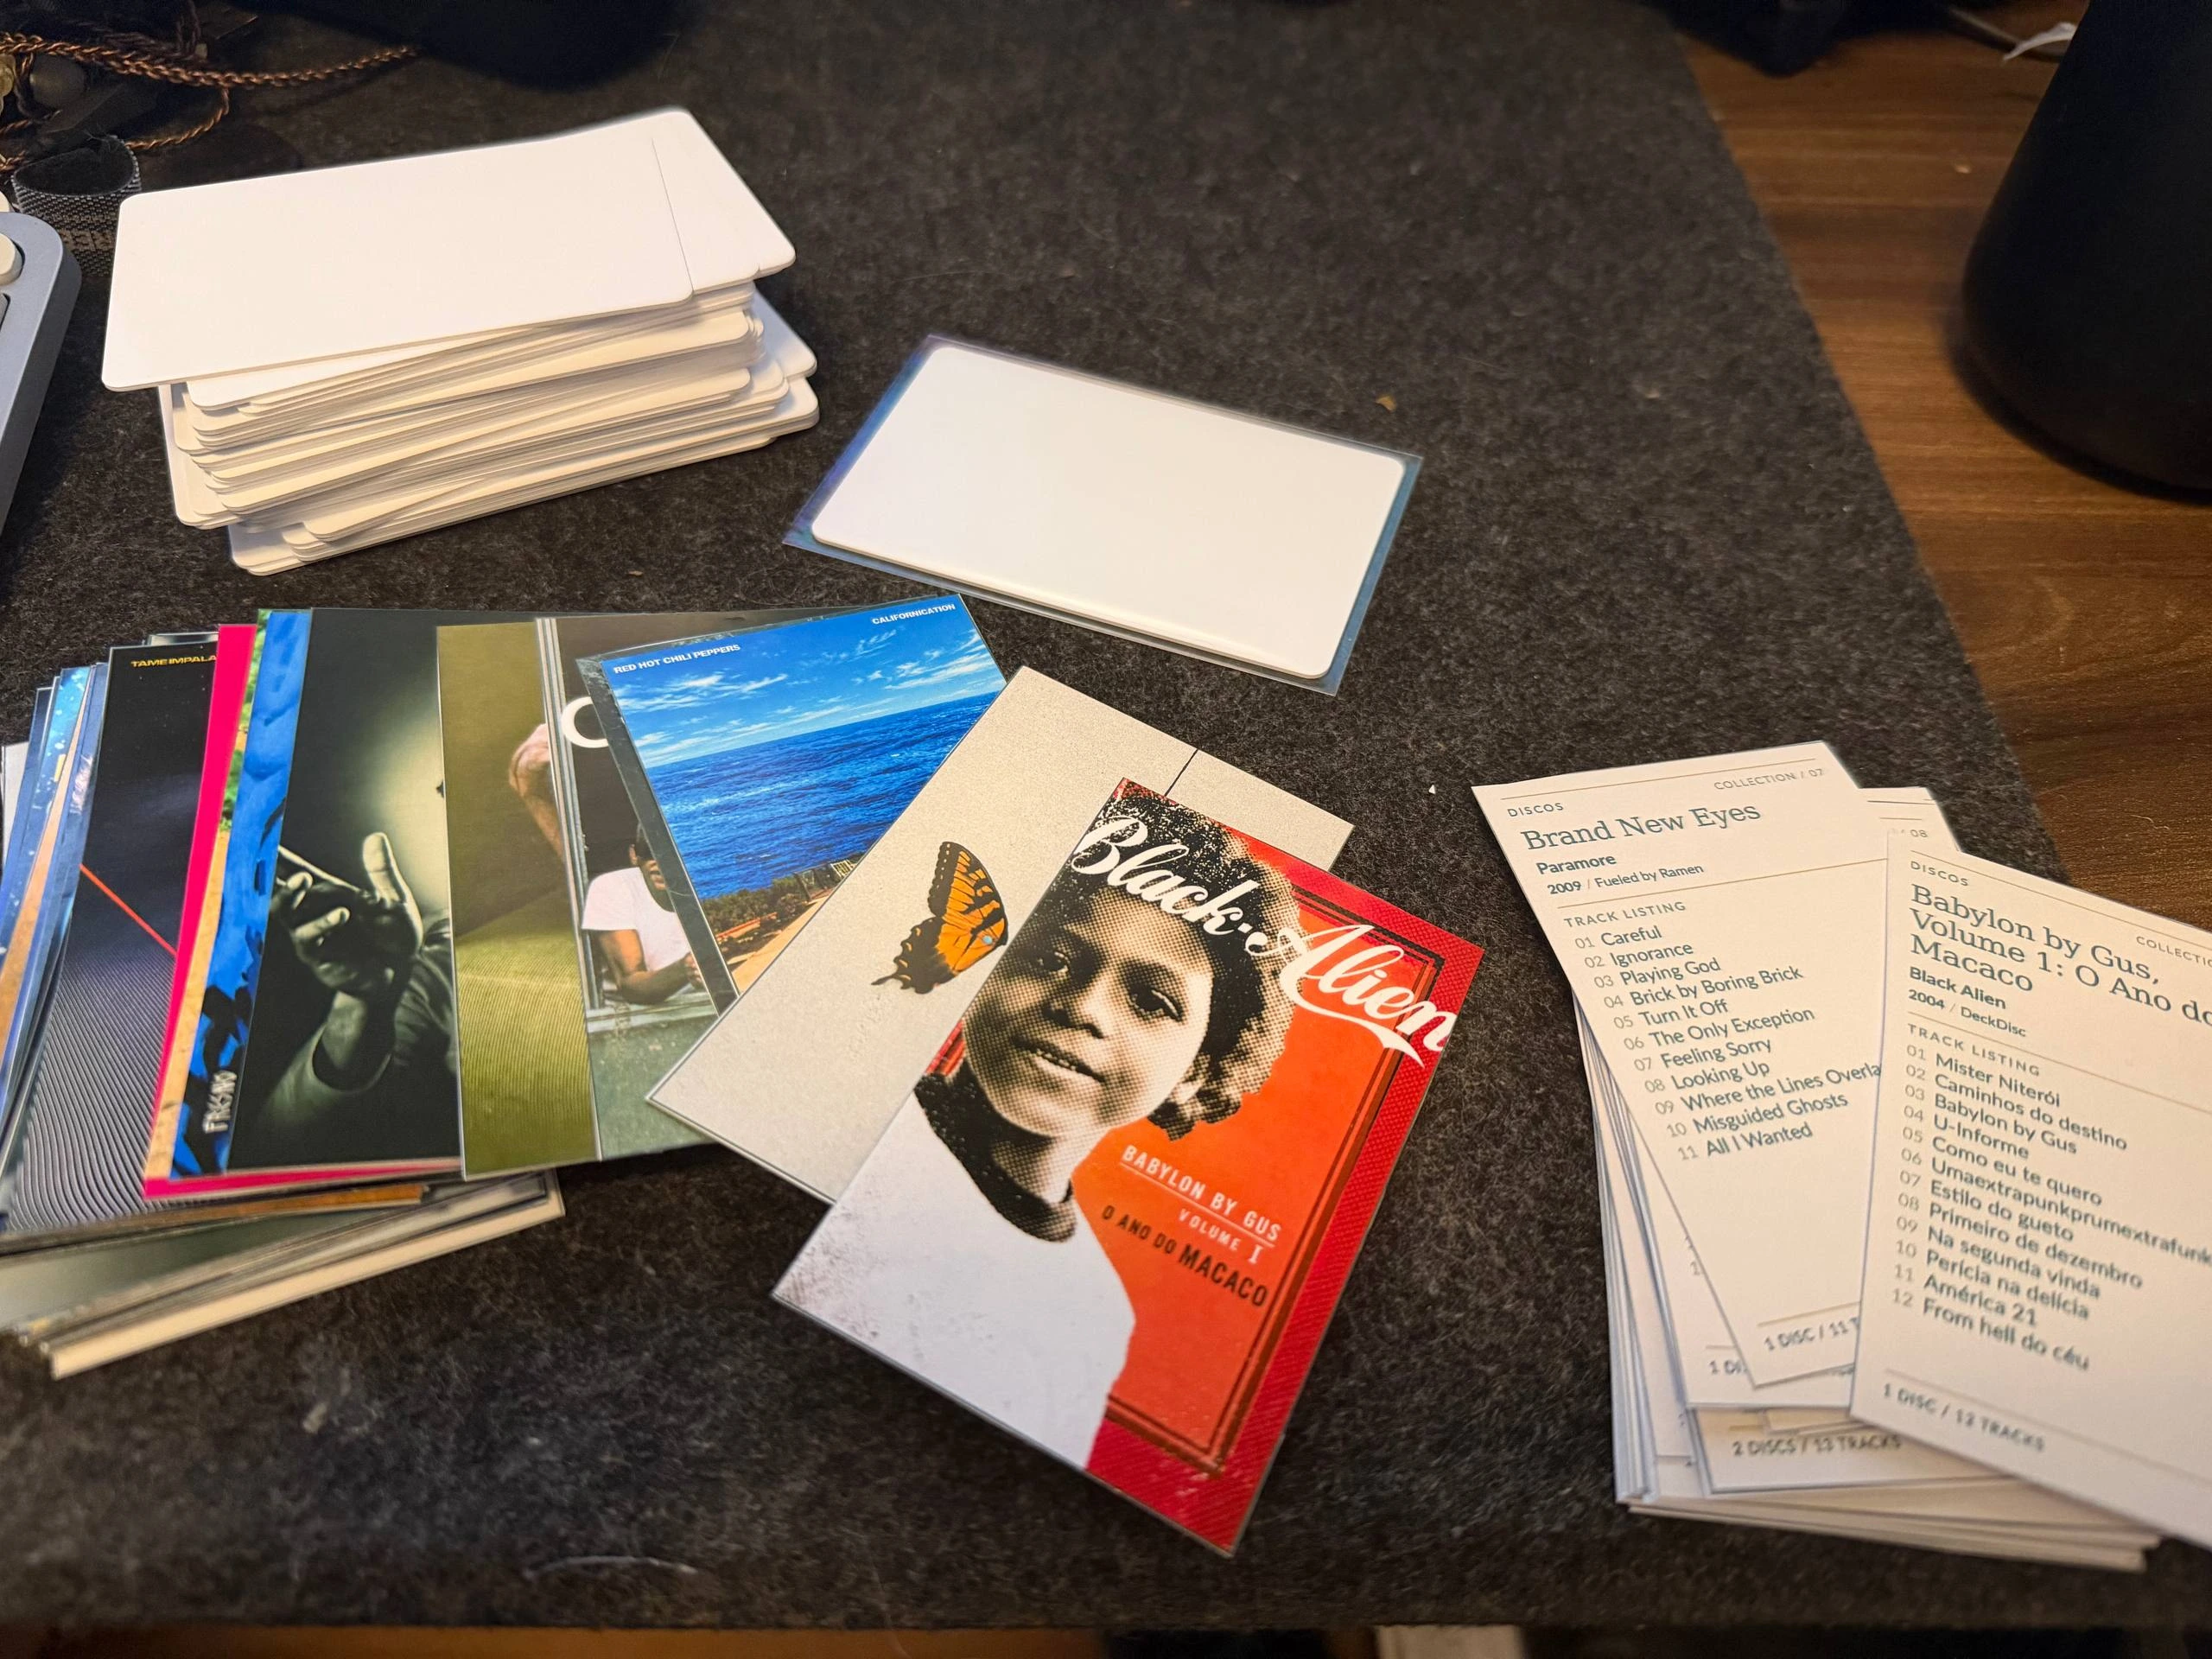
The sleeve link may earn a commission at no additional cost to you. It identifies the material I used; it does not guarantee dimensions for every listing variation.
3D ENCLOSURE
The enclosure is part of the ritual.
I started with a visual study to imagine the finished player. That design then became a model divided into printable parts. The first image is the concept; the second shows the final V3 geometry.
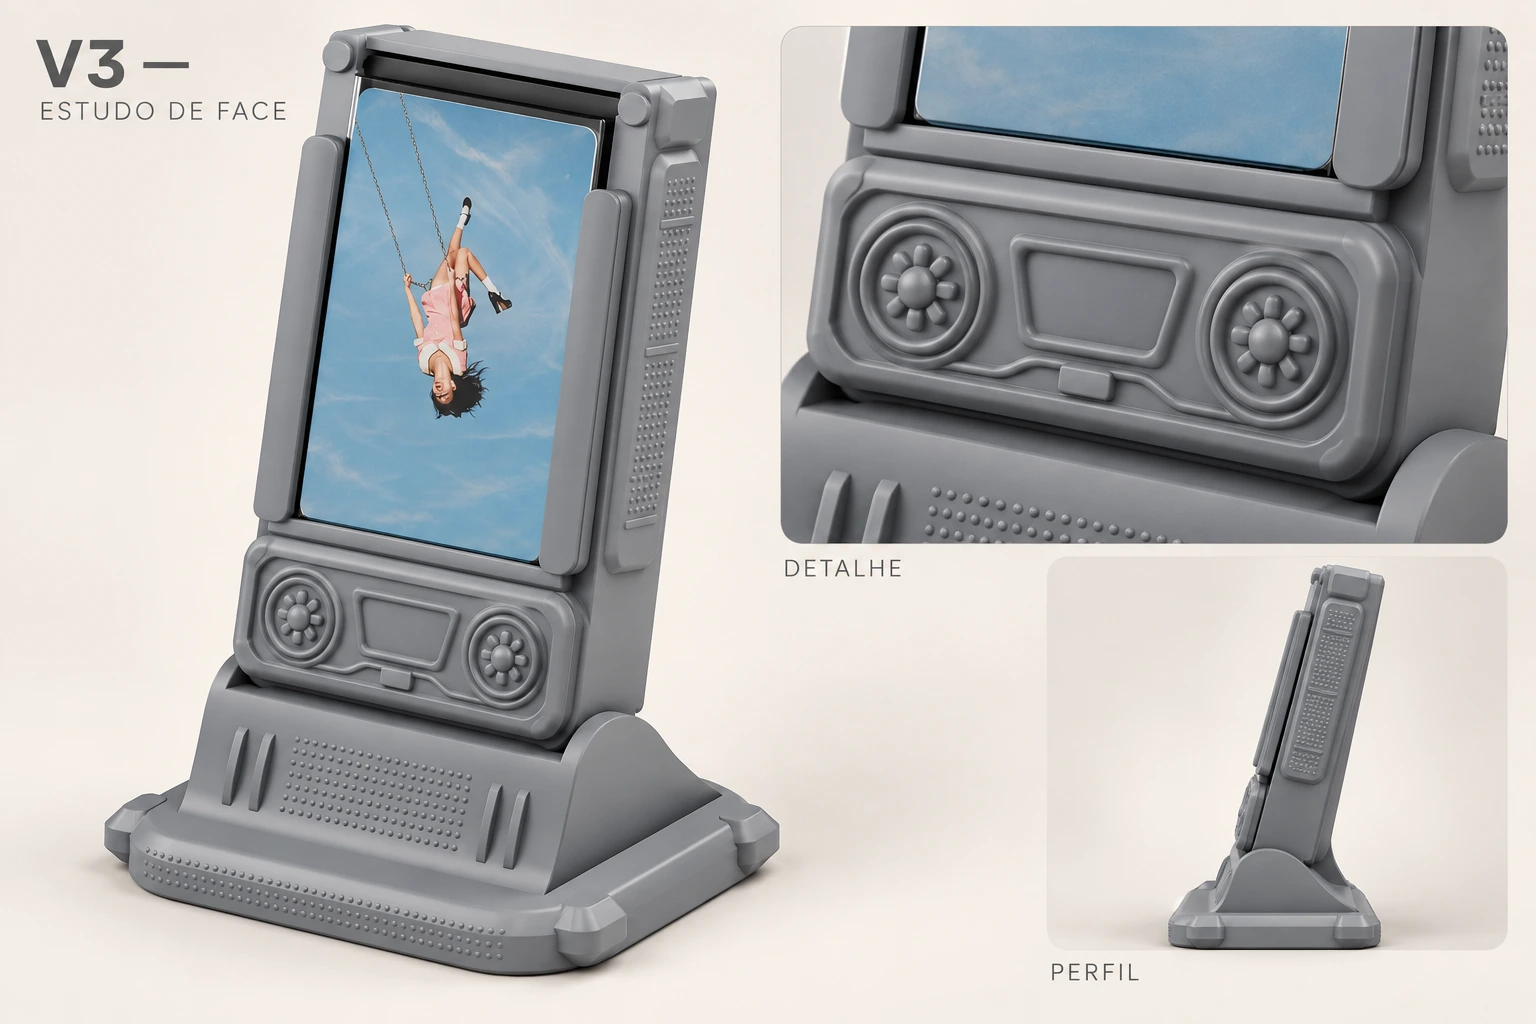
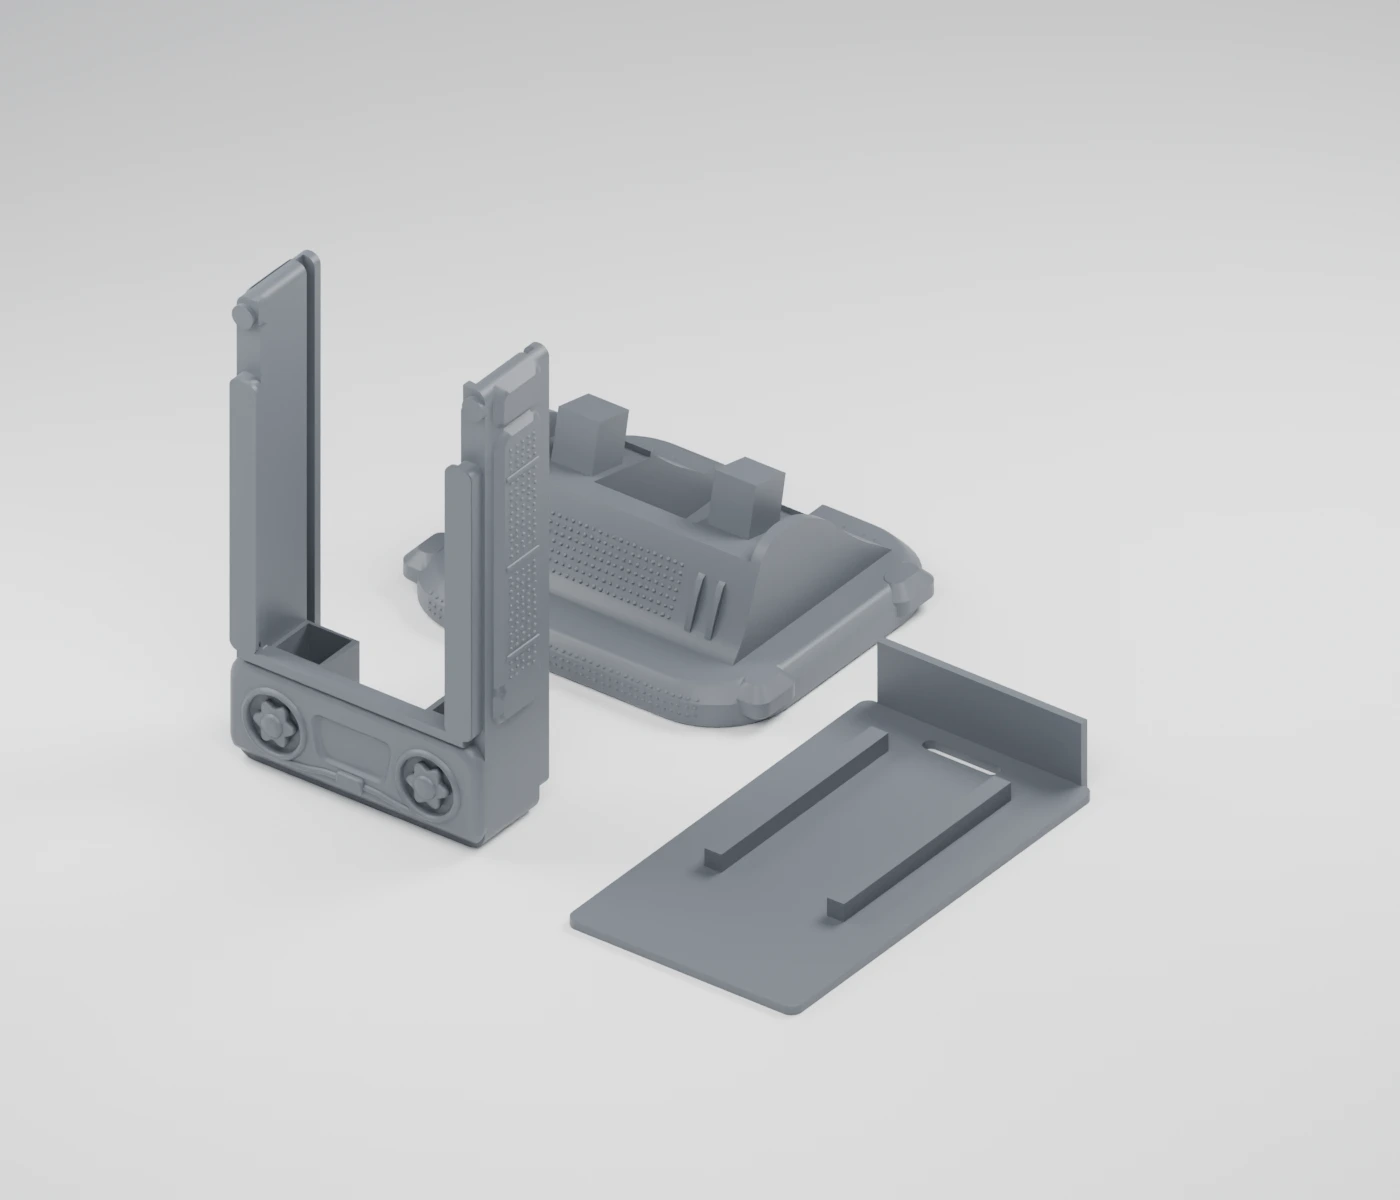
The enclosure is optional. Check the reader dimensions, cable routing and reading range in the intended position before closing it. The V3 files are in hardware/ in the official repository. Use the included instructions when orienting parts in your slicer. The models are by Luiz Guilherme, licensed under CC BY 4.0. You can share and adapt them with attribution.
SPOTIFY
Your Spotify albums, on physical cards.
BEFORE YOU START
How does it work?
Think of each card as a physical shortcut to an album. The picture helps you choose; the small chip lets the system recognize your choice. The songs are not stored on the card.
With Spotify, it is like asking someone to press Play for you:
- You tell Album Cards which Spotify album belongs to each card.
- You tap a card on the USB reader connected to the computer. The app recognizes its number and looks up the album you assigned.
- The app asks Spotify to play that album on the device you selected, the Pi’s Raspotify receiver or the native Spotify app on your Linux PC. Spotify supplies the music.
You do not need a Plex server for this path. You do need Album Cards running on a computer, an internet connection and Spotify Premium for playback control. Linking your account lets the app request playback; it does not copy Spotify songs to the cards.
This path needs Spotify Premium, internet, a Linux computer running Album Cards, a USB reader and compatible cards. It needs no Plex server or downloaded collection. Follow the operating-system steps and install Album Cards, then return here. The reader remains connected to Linux.
The receiver also works without cards: choose it in Spotify Connect on your phone. Read how network playback and audio quality work.
1. Choose where the sound comes out.
On a Raspberry or Orange Pi beside the speakers, use Raspotify, a community Spotify Connect receiver built around librespot. The project’s launcher uses its binary in a user service. On a desktop Linux PC, you can instead use the native Spotify app: sign in, play one song and keep it open. In that variation, Spotify’s desktop autostart and the user’s desktop session must remain active.
For the dedicated Pi receiver, run these inside the Album Cards directory:
bash deployment/dev.sh dependencies
curl -fL "https://dtcooper.github.io/raspotify/raspotify-latest_$(dpkg --print-architecture).deb" -o /tmp/raspotify.deb
bash deployment/dev.sh install-spotify /tmp/raspotify.deb
cp -n deployment/runtime.env.example ~/.config/album-cards/runtime.env
nano ~/.config/album-cards/runtime.env
The first command installs Debian audio and network-discovery prerequisites. In the configuration file, choose a speaker name and the ALSA output from aplay -l. For my Edifier M90, the output is plughw:CARD=M90,DEV=0 and the format is S24_3; use your device’s actual name. Save in nano with Ctrl+O, Enter, then Ctrl+X. If this file already exists, edit it instead of replacing it.
bash deployment/dev.sh spotify upThe first run starts at 20% volume. After you adjust it in Spotify, the receiver remembers your last level across restarts and switches between players. The speaker’s own volume control is separate.
On your phone, open Spotify on the same network and choose “Album Cards” from Connect devices. Play one song through the speakers. This first connection pairs the receiver and lets it cache your login locally. The phone is only a remote: the USB reader stays on the Pi.
Do I still need a developer app and Premium?
| What you want to do | Your own Developer Dashboard app | Spotify Premium |
|---|---|---|
| Choose music on the phone and listen through Raspotify on the Pi | Not needed | Required |
| Tap a card and automatically start its Spotify album with Album Cards | Required, with OAuth authorization | Required |
| Use only your own collection through Plex / Caldera | Not needed | Not needed |
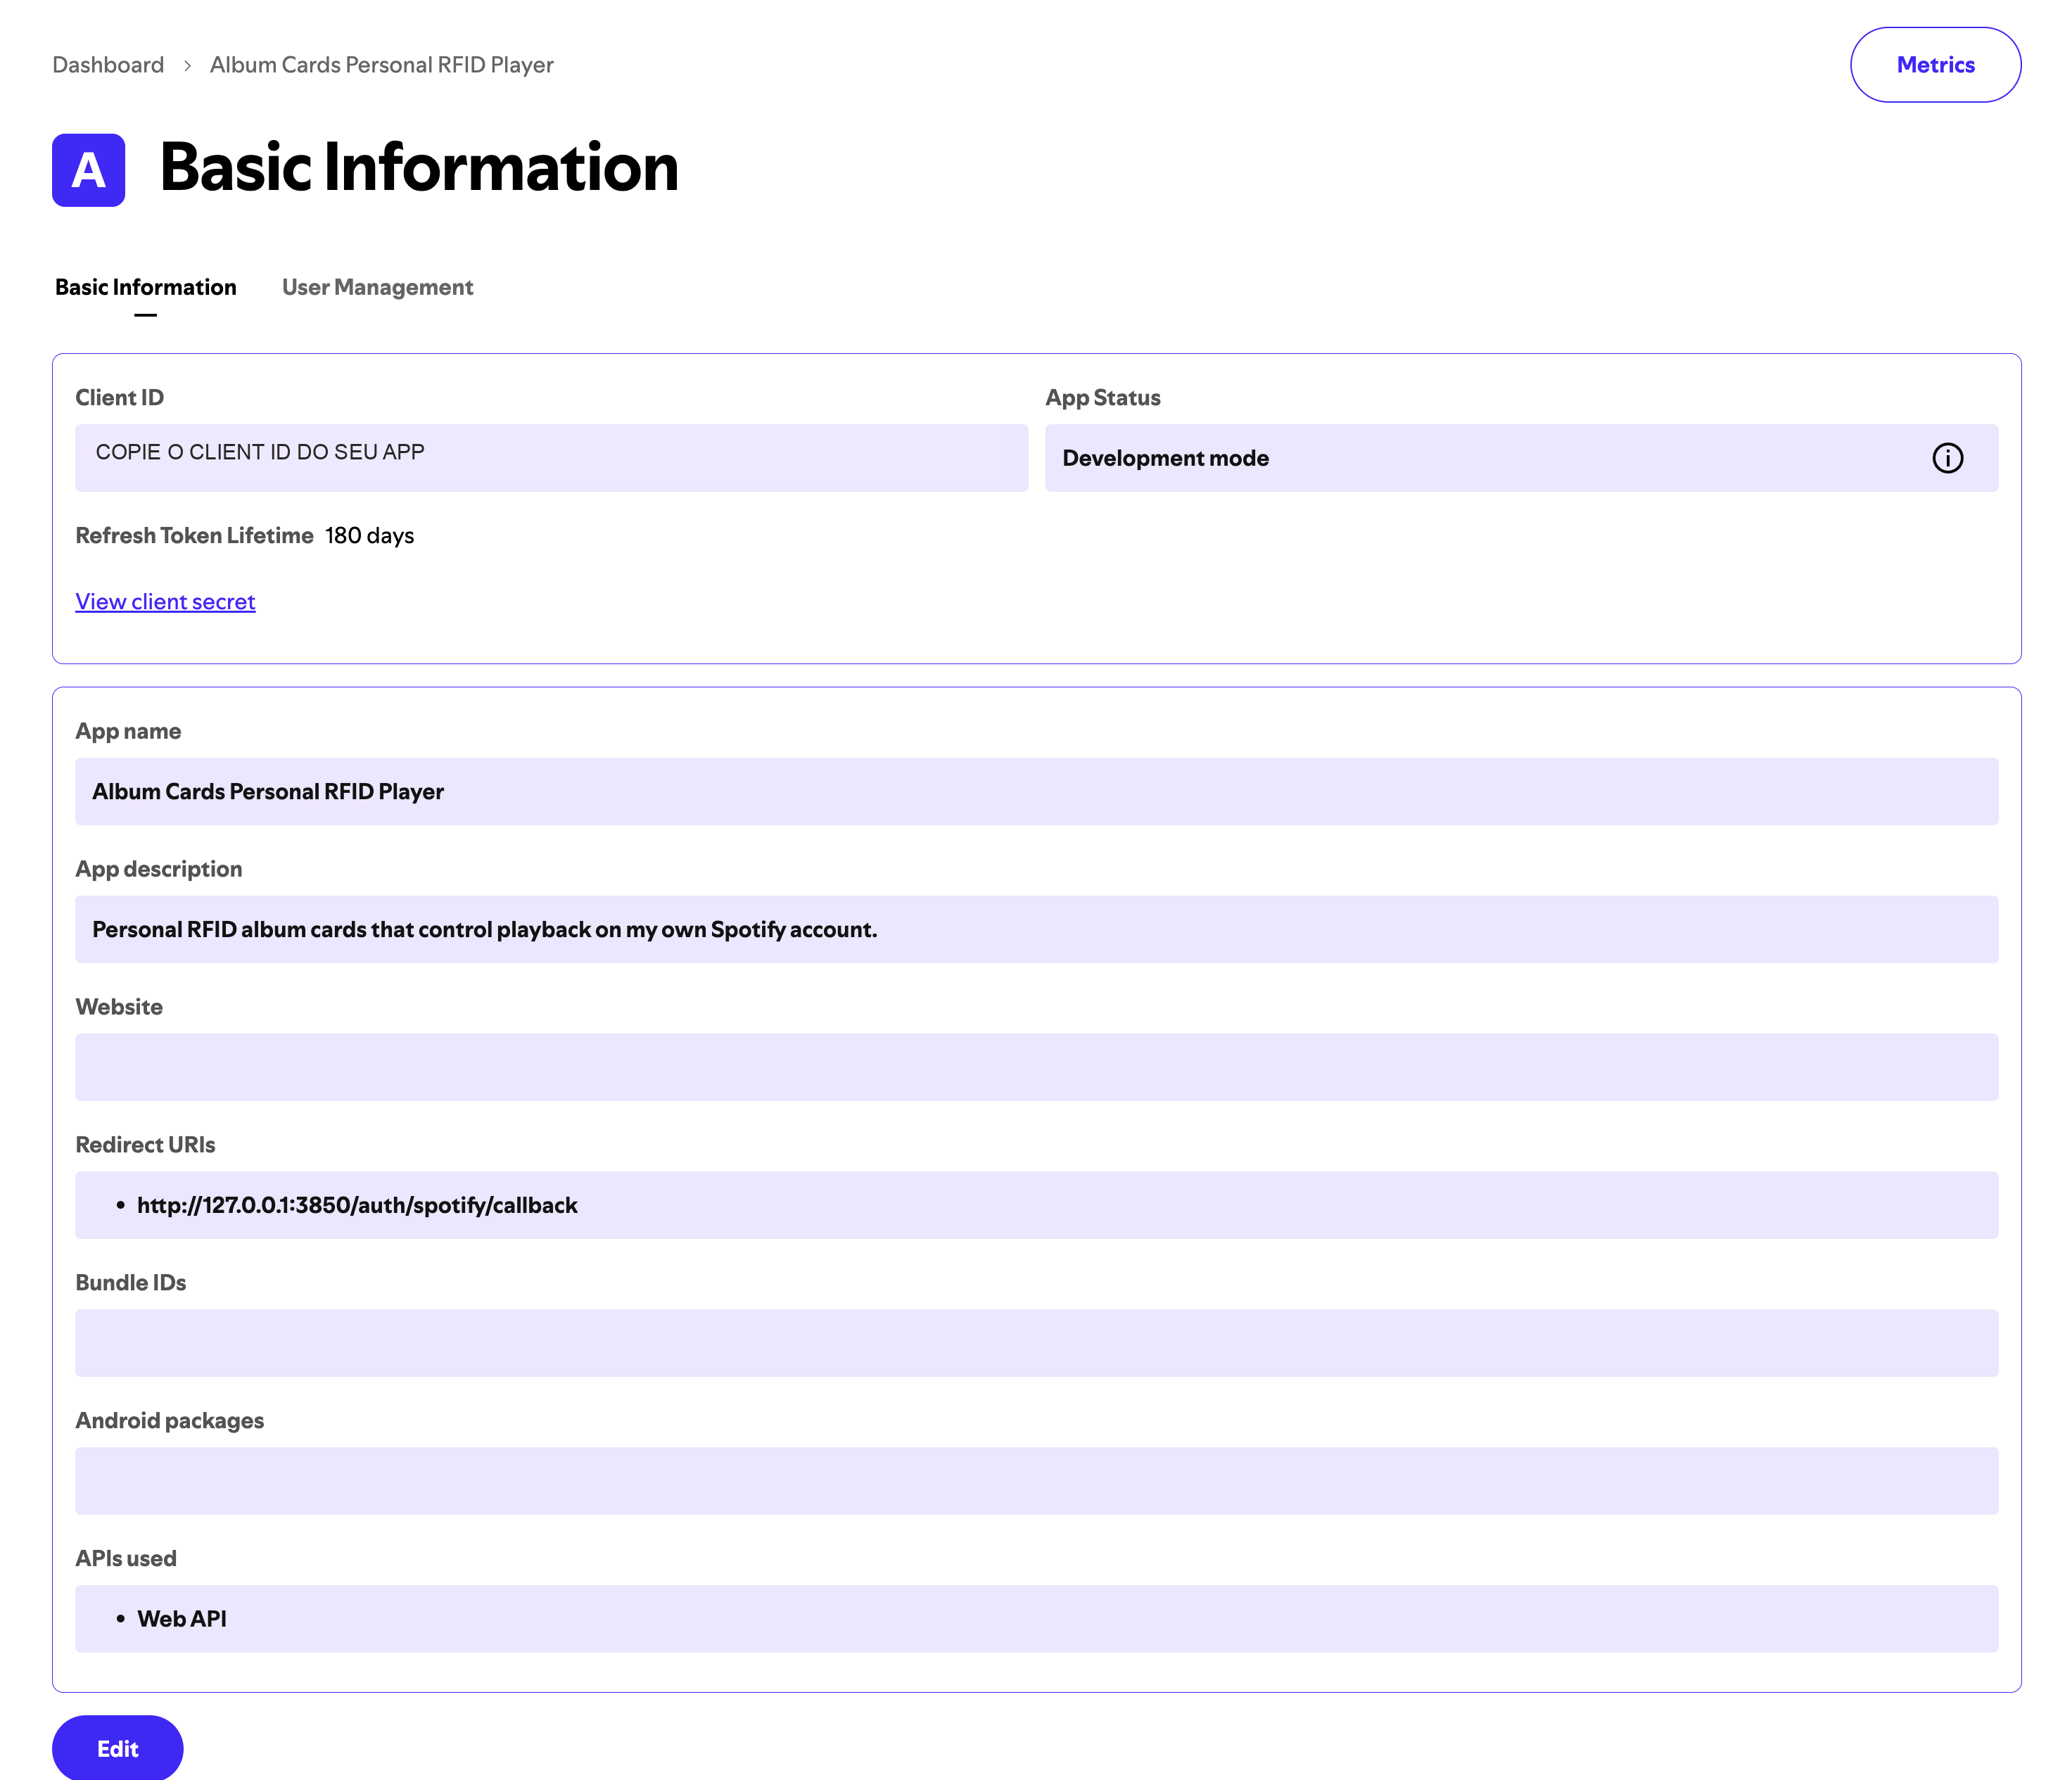
Raspotify receives and plays music; Album Cards uses Spotify’s Web API to choose the album for a card. These are separate jobs. For automatic cards, sign into the Dashboard with your Spotify account, register an app, copy its Client ID and authorize Album Cards once. No separate paid developer subscription or Client Secret is needed for this PKCE flow, and you do not sign in again for every card.
For this self-hosted tutorial, create your own app; do not use the author’s Client ID. Under the current development-mode rules, the app owner needs Premium and the app allows up to five authorized users. Add other users to its allowlist. Publishing the source code does not give everyone access to one shared Spotify app.
Requirements checked in September 2026: Spotify Playback API · Raspotify.
2. Allow Album Cards to control playback.
- Open the Spotify Developer Dashboard, create an app for personal use, choose Web API and complete the required fields.
- Add exactly
http://127.0.0.1:3850/auth/spotify/callbackto Redirect URIs. Save. Do not substitute localhost or the Pi’s network IP. - Copy the Client ID. In Album Cards → Settings → Spotify, paste it and choose Connect Spotify. Approve access in the browser. No Client Secret is needed. Keep the SSH tunnel open throughout this step.
- Choose Find devices, select the Pi receiver (or the native Spotify app on your PC) and Save settings. If absent, return to Spotify and select that device once.
3. Import an album and assign a card.
- In Spotify, open an album → Share → Copy album link. In Album Cards, open Collection → Add albums and paste that album link or ID into Spotify import.
- Test the album’s play button. The selected device should start the album, not just open its page.
- Select the album, open Cards → Assign selected and tap your card on the reader connected to Linux. Check the confirmation, switch to Playback and tap again.
The mapping lives in Album Cards on the Pi: card ID → album → Spotify. Nothing needs to be written into the chip. You may close the configuration browser after setup.
If you chose the native desktop Spotify app instead of Raspotify, use bash deployment/dev.sh enable app. This starts only Album Cards at boot; Spotify still needs the desktop session and its own autostart setting. The command below is for the dedicated receiver.
Turn it on, tap a card, listen.
After installing and connecting the Spotify receiver, run this command from the Album Cards directory on Linux:
bash deployment/dev.sh enable spotifyIt enables Album Cards and the selected player at boot, including when nobody logs in. It may request your Linux password once. The computer must stay powered on and awake. Return the app to Playback mode before finishing; assignment mode is only for registration.
bash deployment/dev.sh status
bash deployment/dev.sh logs
bash deployment/dev.sh restart
These show service status, recent messages and restart the app. Try a restart and a card scan before putting the player away. Back up the data/ folder to preserve assignments, images and private connection settings.
Can I mix Spotify and Plex cards?
Yes. Choose the player in each album’s Details. Imports already select their source service. When both players share one exclusive USB output, enable audio handoff as described in docs/LINUX.en.md, then run bash deployment/dev.sh enable both. Album Cards stops the other player when switching, releasing the audio device. The first card after a switch may take a few seconds.
Spotify API playback requires Premium. Development-mode applications have account and user limits; check the current Dashboard rules. Raspotify is a community project, separate from Spotify. References: Playback API · Redirect URI · Development mode.
Now customize your collection. The following steps cover artwork, PDFs, paper, sleeves and the optional 3D enclosure, just like the Plex version.
ARTWORK AND TRACK LISTS
Fit the artwork to the card.
Click an album image to open the editor. Choose Upload artwork, drag to position it and adjust the zoom. The frame already has the final proportions: 54 mm wide × 85.6 mm tall.
For Abbey Road, I used a vertical image with extra sky and positioned it to keep all four band members near the bottom. A square cover can lose content when cropped to fill the card. Preparing a vertical version first gives you more control. The editor crops and positions artwork; it does not invent or extend backgrounds with AI.
Click Save vertical artwork. The collection updates its preview and marks it ready. The original Plex cover and uploaded crop source stay separate. Editing a card does not change the cover in your Plex library.
Make room for your creativity.
Album covers are usually square; our cards are vertical. There are plenty of ways to bring the two together. For some cards in my collection, I used AI image editing to extend the background before uploading the result to Album Cards. That was a creative choice for my project, not a requirement for yours.
How I prepared the AI-assisted versions
- I started with the original cover in good resolution and attached it as the reference in an image editor with generative expansion.
- I asked for a vertical composition in the card’s proportions, extending the background rather than stretching the picture. The aim was to retain the cover’s identity, subjects and lettering. The position depends on the artwork: not everything needs to sit in the center.
- I compared the result with the original. AI can change faces, lettering and details or create visible seams and repeated objects. I discarded or revised versions that did not work; the first result was not always the one I kept.
- I uploaded the chosen image to Album Cards, adjusted its position and zoom, and saved the final crop. The app handles the print proportions; the AI editing happens separately.
Prefer to design it yourself? Absolutely.
You can keep the original cover exactly as it is and build a lovely card around it in Canva, Photoshop or your favorite editor. A square cover with a colorful border, a little breathing room or a title beneath it can become a template for the whole collection. You do not need to fill every corner with the photograph.
- Create a portrait canvas of 1080 × 1712 px, the same proportions as a 54 × 85.6 mm card.
- Place the complete original cover without stretching it. Choose its size and position, then use the remaining space for a background color, borders or your own graphic elements. Keep small text away from the cutting edge.
- Export as PNG or high-quality JPG. Click the album’s artwork in Album Cards, choose Upload artwork, check the full template in the preview and click Save vertical artwork.
Use the tools you feel comfortable with. Try colors, layouts and materials, and make a test print before committing to a batch. The fun is making a collection that feels like yours — creativity matters more than following my layout.
Prepare the back, too.
In Details, check the title, artist, year, record label and tracks. Each track has a number and disc number; use disc 1 and disc 2 for multi-disc editions. The import depends on metadata from the source service, so you may need to enter a missing label yourself.
Click Facts to preview the back before printing. The card uses those details, separates discs and fits the text into the available space. If it cannot fit within the legibility limit, generation reports an error instead of cutting off the last lines. Exported JSON stores album metadata for backup or transfer between installations.
PRINTING AND ASSEMBLY
Print a test sheet first.
- Select your albums, up to 50 per batch, and open Print studio.
- Choose Generate cover PDF for the fronts. Each selected album must have saved vertical artwork.
- Choose Generate fact sheet PDF for the backs. Both PDFs use the selection in alphabetical order.
- Review the preview and download the PDF. Select A4 paper, landscape orientation and 100% / actual size. Turn off “fit to page”.
- Measure a printed card: it should be 54 × 85.6 mm. Cut and assemble one before printing the whole collection.
Each sheet fits 10 cards, with 3 mm between artworks. For duplex printing, “Mirror back order” is available. The correct flip edge depends on your printer; test with one clearly marked sheet first. You can also print the fronts and backs separately, which is what I did.
The finished PDF, before using paper.
These are actual pages generated by the new app with the six example albums. The empty space is expected: the sheet holds ten cards, but this batch contains six.
Open sample PDF — covers · Open sample PDF — track lists
How I printed and assembled mine.
I printed the fronts on thicker, glossy photo paper to give the cover more presence. For the backs, I used thinner, matte photo paper, which makes the track list comfortable to read. These are separate printouts on different papers.
- Start with plain paper. Print at 100%, measure 54 × 85.6 mm and confirm that each front matches its back.
- Select the paper type in the printer dialog. Use the recommended setting for your glossy or matte paper and check the thickness your printer supports. There is no single required paper weight.
- Let the prints dry. Follow the paper manufacturer’s guidance before stacking, cutting or sleeving them.
- Cut along the marks. The 3 mm gaps give you room to separate the cards without cutting into the artwork. A ruler and cutting mat help keep the edges straight.
- Assemble one complete card. Put the RFID card between its cover and matching track list, with the printed faces outward. Test reading and fit before repeating for the whole batch.
The sleeve holds everything together.
I used Chimera sleeves measuring 57.5 × 89 mm to hold and protect the card and both printouts. Here is the 100-pack I used ↗. Check the dimensions of the selected product variation and test with your chosen paper: the combined thickness matters too. Do not force or bend the card to insert it.
The sleeve link may earn a commission at no additional cost to you. It identifies the material I used; it does not guarantee dimensions for every listing variation.
3D ENCLOSURE
The enclosure is part of the ritual.
I started with a visual study to imagine the finished player. That design then became a model divided into printable parts. The first image is the concept; the second shows the final V3 geometry.
The enclosure is optional. Check the reader dimensions, cable routing and reading range in the intended position before closing it. The V3 files are in hardware/ in the official repository. Use the included instructions when orienting parts in your slicer. The models are by Luiz Guilherme, licensed under CC BY 4.0. You can share and adapt them with attribution.
FAQ
Questions before you build?
Do the songs live on the card?
No. The card selects an album. In the full setup, the files stay on your Plex server; in the Spotify setup, Spotify provides the music. A cover image or printed track list is not required for playback.
Do I have to buy a Raspberry Pi?
No. My build uses an Orange Pi 3B. A compatible 64-bit Linux PC can fill that role, including one you already own. Both paths require the computer to remain powered on and awake.
Do I need to program each chip?
No. Select an album in Album Cards, start assignment and tap the card. The app saves the ID-to-album relationship on Linux; the card itself needs no Spotify URL or music files.
Will any reader or card work?
Not necessarily. Use compatible 13.56 MHz cards and a USB keyboard reader that sends numeric IDs followed by Enter. The product name alone does not establish compatibility; test one card first.
Does removing the card pause the music?
No. This USB reader sends an ID when it reads a card; its LED changing color does not tell the app that you removed it. Repeating a card chooses another track; changing cards starts another album.
Can I change which album a card plays?
Yes. Reassign it in Album Cards, confirming replacement if it already has an assignment. Update its printed artwork and track list too, so the card still matches what plays.
Do I need AI artwork or a 3D printer?
Neither is required. Keep the original cover in your own template, upload it and adjust the crop. The enclosure is optional; you can start with the reader on a table and one test card.
What has been tested?
Physical cards, automatic switching between Plex/Caldera and Spotify, and USB audio on the Edifier M90 were tested successfully on the Orange Pi 3B. Services are enabled at boot; a full cold-boot test remains pending. Other boards and readers need their own compatibility tests.
Does the browser need to stay open?
No, when you select native Linux input and enable the service. The app keeps reading cards in the background. You only open the browser to change the collection, assignments or artwork.
Already building and stuck? See the troubleshooting steps below.
WHEN SOMETHING DOES NOT WORK
Start with the last successful step.
The reader beeps and turns green, but the app receives nothing.
Open an empty text editor and tap the card. If no ID appears, try another port and a USB data cable. If it works in the editor, check that the Linux device is selected in Settings and its status is connected. Native input needs no focused field. A beep confirms the reader reacted to the card, not that it communicated with the app.
The card is assigned but nothing plays.
Check that Playback mode is selected. Try the album’s ▶ button. If it fails too, check Plex, Caldera, the audio output and provider settings. If the button works, check the received ID against the card assignment.
Caldera does not appear in discovery.
Check that it is running, signed into the same Plex account and reachable from the server’s network. Avoid guest networks. Discovery depends on Plex’s client list; you can enter the address and identifier manually.
Plex shows the album but says the tracks are missing.
Check the external drive, mount, permissions and folder path on the server. Restore access to the files before refreshing the library. Importing the catalog does not fix a missing file.
The back has incorrect details or missing tracks.
Open Details and compare it with your edition. Deluxe, live and remastered releases may have different track lists. The 5+ tracks filter only hides short releases; it does not validate completeness. Correct the metadata and generate the card again.
It stopped working when I closed the terminal.
The app must keep running to receive scans and send commands. Keep the terminal open during testing. For permanent use, follow the startup-service section and run bash deployment/dev.sh enable plex or enable spotify. Test a reboot afterward.
The printed cards are too small or the backs are swapped.
Use actual size, 100%, without automatic scaling. For duplex printing, test mirrored back order and the printer’s flip edge on one sheet. The PDF preview cannot know your printer’s physical settings.
Still have a question? Send me a DM.
You can find me on Instagram at @ofertasdiscos. Tell me which path you chose, what equipment you are using and where you got stuck. A photo of the setup or a screenshot of the error can help me understand.
And if you get it working, I would love to see your collection and the ideas you came up with!
CODE, DOCUMENTATION AND ENCLOSURE
Made for you to adapt.
Album Cards was rebuilt in TypeScript, with Portuguese and English documentation, to bring everything into one app. The software is MIT-licensed. The official repository is public and free, with English documentation. Both versions of this tutorial use the same application.
The V3 enclosure package is in hardware/, including STL and 3MF files and orientation notes. The models are by Luiz Guilherme and licensed under CC BY 4.0: you may share and adapt them with attribution. Music files, credentials and my personal library are not included in the source code; the covers in these screenshots illustrate the workflow using my collection.
Back up the app’s data/ folder to preserve your setup. It contains the collection and private connection information. Store it securely and keep it out of public repositories.